

69
Georeferencing an Image
Earth representation. Add a few more correspondence points if you feel
necessary to adjust for areas that don’t match up well.
3.3 Matching the Source Map to the Virtual Earth
When you have the Source Map set up the way you want it, it’s time to complete the process.
1. You may first want to save your work, by selecting the File pull–down
menu and choosing Save Mashup. Give your work a file name and save
it on your machine (it will save with the file extension “.yum”).
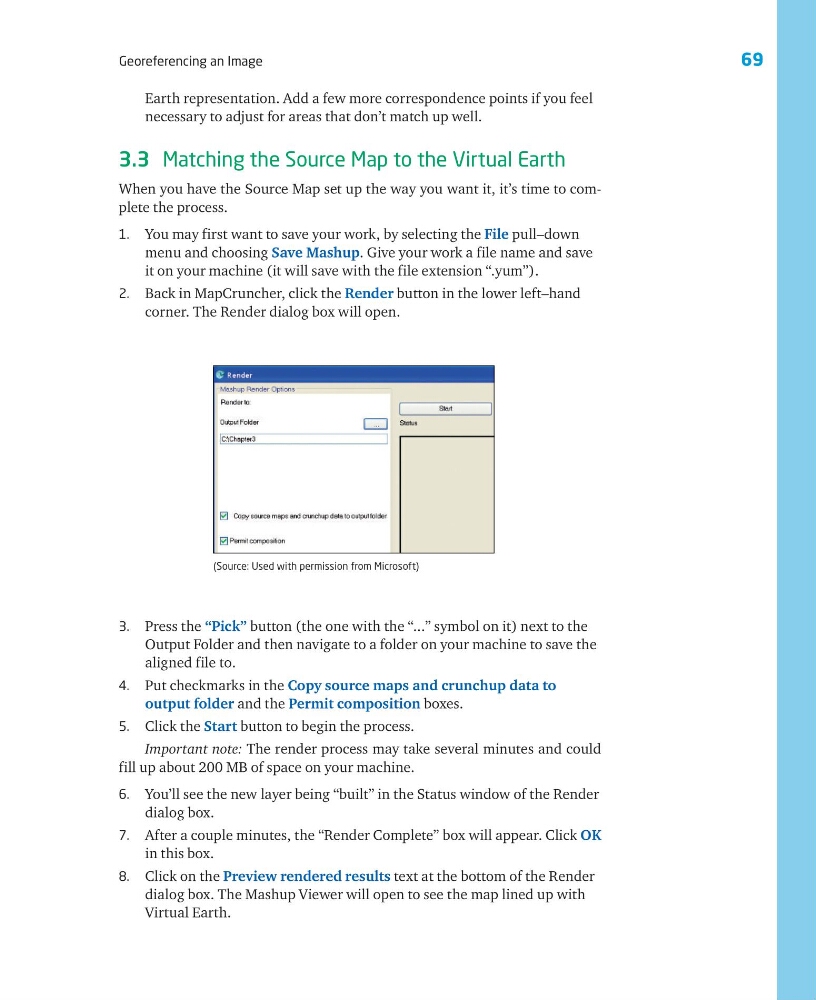
2. Back in MapCruncher, click the Render button in the lower left–hand
corner. The Render dialog box will open.
(Source: Used with permission from Microsoft)
3. Press the “Pick” button (the one with the “...” symbol on it) next to the
Output Folder and then navigate to a folder on your machine to save the
aligned file to.
4. Put checkmarks in the Copy source maps and crunchup data to
output folder and the Permit composition boxes.
5. Click the Start button to begin the process.
Important note: The render process may take several minutes and could
fill up about 200 MB of space on your machine.
6. You’ll see the new layer being “built” in the Status window of the Render
dialog box.
7. After a couple minutes, the “Render Complete” box will appear. Click OK
in this box.
8. Click on the Preview rendered results text at the bottom of the Render
dialog box. The Mashup Viewer will open to see the map lined up with
Virtual Earth.
Georeferencing an Image
Earth representation. Add a few more correspondence points if you feel
necessary to adjust for areas that don’t match up well.
3.3 Matching the Source Map to the Virtual Earth
When you have the Source Map set up the way you want it, it’s time to complete the process.
1. You may first want to save your work, by selecting the File pull–down
menu and choosing Save Mashup. Give your work a file name and save
it on your machine (it will save with the file extension “.yum”).
2. Back in MapCruncher, click the Render button in the lower left–hand
corner. The Render dialog box will open.
(Source: Used with permission from Microsoft)
3. Press the “Pick” button (the one with the “...” symbol on it) next to the
Output Folder and then navigate to a folder on your machine to save the
aligned file to.
4. Put checkmarks in the Copy source maps and crunchup data to
output folder and the Permit composition boxes.
5. Click the Start button to begin the process.
Important note: The render process may take several minutes and could
fill up about 200 MB of space on your machine.
6. You’ll see the new layer being “built” in the Status window of the Render
dialog box.
7. After a couple minutes, the “Render Complete” box will appear. Click OK
in this box.
8. Click on the Preview rendered results text at the bottom of the Render
dialog box. The Mashup Viewer will open to see the map lined up with
Virtual Earth.