

397
Digital Terrain Analysis
4. Click Open to start using this DEM in MICRODEM. (The DEM will open
in a new viewer.)
5. Before moving on, use the DEM and the view in Google Earth to orient
yourself to where, spatially, Hanging Rock Canyon is and what section
of the landscape is being displayed by the DEM.
6. When you have yourself oriented, right-click anywhere on the DEM and
a new menu will appear. From the available options, select Load, then
select Google Earth overlay.
7. MICRODEM will then apply a draped image of the DEM over its
corresponding area inside of Google Earth (and add a new object called
MICRODEM to Google Earth’s Temporary Places folder). This will show
you where the DEM’s parameters match up with the Google Earth
imagery.
13.5 Hillshades
1. To change the appearance of the DEM, right-click anywhere on the
image and a new menu will appear. From the available options, select
Reflectance Options.
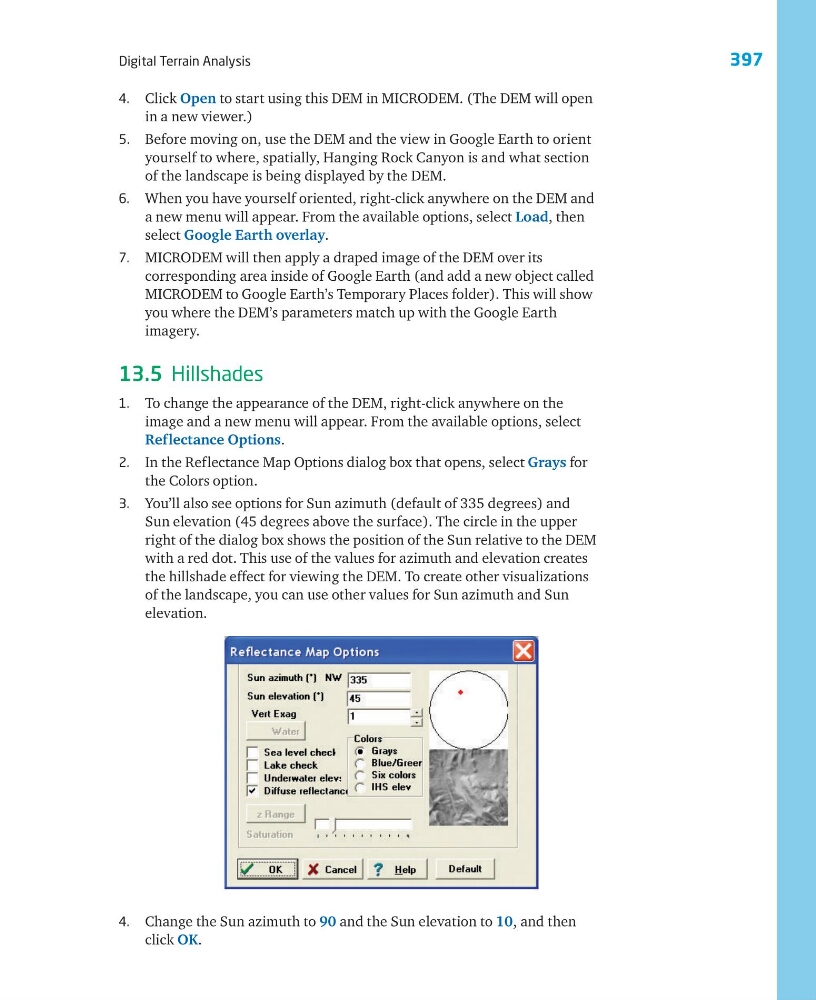
2. In the Reflectance Map Options dialog box that opens, select Grays for
the Colors option.
3. You’ll also see options for Sun azimuth (default of 335 degrees) and
Sun elevation (45 degrees above the surface). The circle in the upper
right of the dialog box shows the position of the Sun relative to the DEM
with a red dot. This use of the values for azimuth and elevation creates
the hillshade effect for viewing the DEM. To create other visualizations
of the landscape, you can use other values for Sun azimuth and Sun
elevation.
4. Change the Sun azimuth to 90 and the Sun elevation to 10, and then
click OK.
Digital Terrain Analysis
4. Click Open to start using this DEM in MICRODEM. (The DEM will open
in a new viewer.)
5. Before moving on, use the DEM and the view in Google Earth to orient
yourself to where, spatially, Hanging Rock Canyon is and what section
of the landscape is being displayed by the DEM.
6. When you have yourself oriented, right-click anywhere on the DEM and
a new menu will appear. From the available options, select Load, then
select Google Earth overlay.
7. MICRODEM will then apply a draped image of the DEM over its
corresponding area inside of Google Earth (and add a new object called
MICRODEM to Google Earth’s Temporary Places folder). This will show
you where the DEM’s parameters match up with the Google Earth
imagery.
13.5 Hillshades
1. To change the appearance of the DEM, right-click anywhere on the
image and a new menu will appear. From the available options, select
Reflectance Options.
2. In the Reflectance Map Options dialog box that opens, select Grays for
the Colors option.
3. You’ll also see options for Sun azimuth (default of 335 degrees) and
Sun elevation (45 degrees above the surface). The circle in the upper
right of the dialog box shows the position of the Sun relative to the DEM
with a red dot. This use of the values for azimuth and elevation creates
the hillshade effect for viewing the DEM. To create other visualizations
of the landscape, you can use other values for Sun azimuth and Sun
elevation.
4. Change the Sun azimuth to 90 and the Sun elevation to 10, and then
click OK.