

17
Introduction to Geospatial Concepts and Google Earth
5. In GE, you can rotate and zoom your view to get a closer look at the
imagery on the ground. Move the mouse to the upper right-hand side of
the screen and a set of controls will appear. These fade out when not in
use and reappear when the mouse rolls over them.
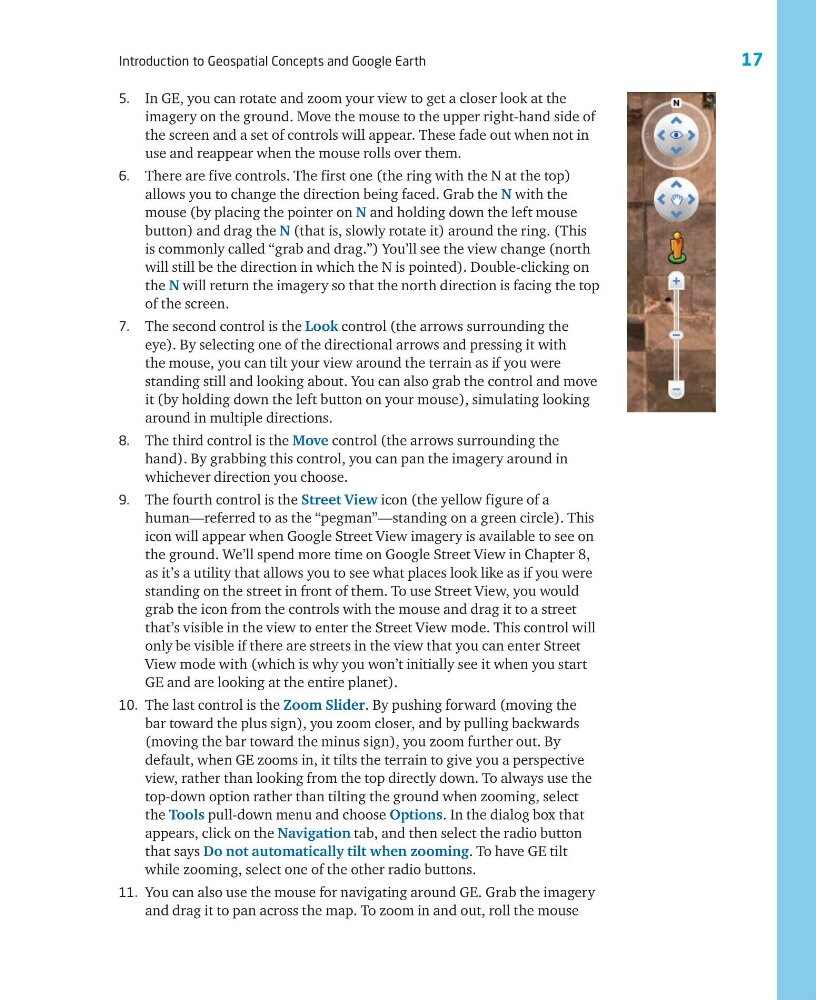
6. There are five controls. The first one (the ring with the N at the top)
allows you to change the direction being faced. Grab the N with the
mouse (by placing the pointer on N and holding down the left mouse
button) and drag the N (that is, slowly rotate it) around the ring. (This
is commonly called “grab and drag.”) You’ll see the view change (north
will still be the direction in which the N is pointed). Double-clicking on
the N will return the imagery so that the north direction is facing the top
of the screen.
7. The second control is the Look control (the arrows surrounding the
eye). By selecting one of the directional arrows and pressing it with
the mouse, you can tilt your view around the terrain as if you were
standing still and looking about. You can also grab the control and move
it (by holding down the left button on your mouse), simulating looking
around in multiple directions.
8. The third control is the Move control (the arrows surrounding the
hand). By grabbing this control, you can pan the imagery around in
whichever direction you choose.
9. The fourth control is the Street View icon (the yellow figure of a
human—referred to as the “pegman”—standing on a green circle). This
icon will appear when Google Street View imagery is available to see on
the ground. We’ll spend more time on Google Street View in Chapter 8,
as it’s a utility that allows you to see what places look like as if you were
standing on the street in front of them. To use Street View, you would
grab the icon from the controls with the mouse and drag it to a street
that’s visible in the view to enter the Street View mode. This control will
only be visible if there are streets in the view that you can enter Street
View mode with (which is why you won’t initially see it when you start
GE and are looking at the entire planet).
10. The last control is the Zoom Slider. By pushing forward (moving the
bar toward the plus sign), you zoom closer, and by pulling backwards
(moving the bar toward the minus sign), you zoom further out. By
default, when GE zooms in, it tilts the terrain to give you a perspective
view, rather than looking from the top directly down. To always use the
top-down option rather than tilting the ground when zooming, select
the Tools pull-down menu and choose Options. In the dialog box that
appears, click on the Navigation tab, and then select the radio button
that says Do not automatically tilt when zooming. To have GE tilt
while zooming, select one of the other radio buttons.
11. You can also use the mouse for navigating around GE. Grab the imagery
and drag it to pan across the map. To zoom in and out, roll the mouse
Introduction to Geospatial Concepts and Google Earth
5. In GE, you can rotate and zoom your view to get a closer look at the
imagery on the ground. Move the mouse to the upper right-hand side of
the screen and a set of controls will appear. These fade out when not in
use and reappear when the mouse rolls over them.
6. There are five controls. The first one (the ring with the N at the top)
allows you to change the direction being faced. Grab the N with the
mouse (by placing the pointer on N and holding down the left mouse
button) and drag the N (that is, slowly rotate it) around the ring. (This
is commonly called “grab and drag.”) You’ll see the view change (north
will still be the direction in which the N is pointed). Double-clicking on
the N will return the imagery so that the north direction is facing the top
of the screen.
7. The second control is the Look control (the arrows surrounding the
eye). By selecting one of the directional arrows and pressing it with
the mouse, you can tilt your view around the terrain as if you were
standing still and looking about. You can also grab the control and move
it (by holding down the left button on your mouse), simulating looking
around in multiple directions.
8. The third control is the Move control (the arrows surrounding the
hand). By grabbing this control, you can pan the imagery around in
whichever direction you choose.
9. The fourth control is the Street View icon (the yellow figure of a
human—referred to as the “pegman”—standing on a green circle). This
icon will appear when Google Street View imagery is available to see on
the ground. We’ll spend more time on Google Street View in Chapter 8,
as it’s a utility that allows you to see what places look like as if you were
standing on the street in front of them. To use Street View, you would
grab the icon from the controls with the mouse and drag it to a street
that’s visible in the view to enter the Street View mode. This control will
only be visible if there are streets in the view that you can enter Street
View mode with (which is why you won’t initially see it when you start
GE and are looking at the entire planet).
10. The last control is the Zoom Slider. By pushing forward (moving the
bar toward the plus sign), you zoom closer, and by pulling backwards
(moving the bar toward the minus sign), you zoom further out. By
default, when GE zooms in, it tilts the terrain to give you a perspective
view, rather than looking from the top directly down. To always use the
top-down option rather than tilting the ground when zooming, select
the Tools pull-down menu and choose Options. In the dialog box that
appears, click on the Navigation tab, and then select the radio button
that says Do not automatically tilt when zooming. To have GE tilt
while zooming, select one of the other radio buttons.
11. You can also use the mouse for navigating around GE. Grab the imagery
and drag it to pan across the map. To zoom in and out, roll the mouse