

218
Chapter 7 Using GIS to Make a Map
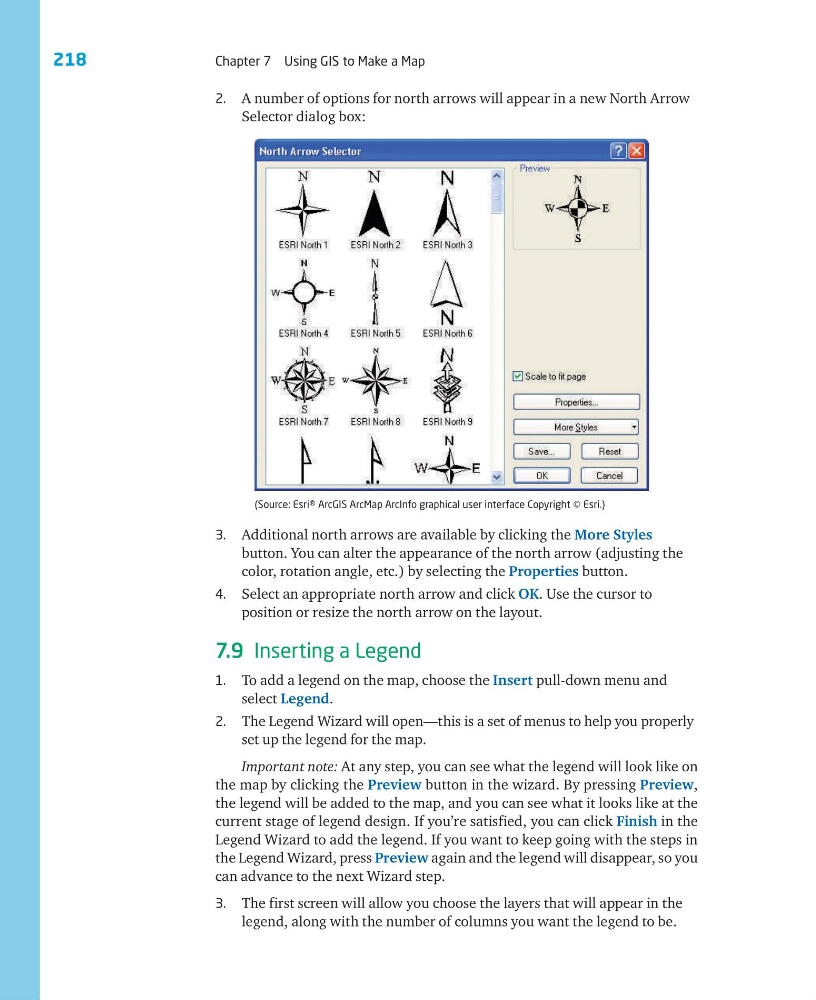
2. A number of options for north arrows will appear in a new North Arrow
Selector dialog box:
(Source: Esri® ArcGIS ArcMap ArcInfo graphical user interface Copyright © Esri.)
3. Additional north arrows are available by clicking the More Styles
button. You can alter the appearance of the north arrow (adjusting the
color, rotation angle, etc.) by selecting the Properties button.
4. Select an appropriate north arrow and click OK. Use the cursor to
position or resize the north arrow on the layout.
7.9 Inserting a Legend
1. To add a legend on the map, choose the Insert pull-down menu and
select Legend.
2. The Legend Wizard will open—this is a set of menus to help you properly
set up the legend for the map.
Important note: At any step, you can see what the legend will look like on
the map by clicking the Preview button in the wizard. By pressing Preview,
the legend will be added to the map, and you can see what it looks like at the
current stage of legend design. If you’re satisfied, you can click Finish in the
Legend Wizard to add the legend. If you want to keep going with the steps in
the Legend Wizard, press Preview again and the legend will disappear, so you
can advance to the next Wizard step.
3. The first screen will allow you choose the layers that will appear in the
legend, along with the number of columns you want the legend to be.
Chapter 7 Using GIS to Make a Map
2. A number of options for north arrows will appear in a new North Arrow
Selector dialog box:
(Source: Esri® ArcGIS ArcMap ArcInfo graphical user interface Copyright © Esri.)
3. Additional north arrows are available by clicking the More Styles
button. You can alter the appearance of the north arrow (adjusting the
color, rotation angle, etc.) by selecting the Properties button.
4. Select an appropriate north arrow and click OK. Use the cursor to
position or resize the north arrow on the layout.
7.9 Inserting a Legend
1. To add a legend on the map, choose the Insert pull-down menu and
select Legend.
2. The Legend Wizard will open—this is a set of menus to help you properly
set up the legend for the map.
Important note: At any step, you can see what the legend will look like on
the map by clicking the Preview button in the wizard. By pressing Preview,
the legend will be added to the map, and you can see what it looks like at the
current stage of legend design. If you’re satisfied, you can click Finish in the
Legend Wizard to add the legend. If you want to keep going with the steps in
the Legend Wizard, press Preview again and the legend will disappear, so you
can advance to the next Wizard step.
3. The first screen will allow you choose the layers that will appear in the
legend, along with the number of columns you want the legend to be.