

Designing and Creating a Smart Audiometer Using …
279
of the sound is measured in frequencies (Hz). Low bass tones vary between 50 and
60 Hz, and high tones vary between 10,000 Hz and over. The normal listening range
is 125 and 8000 Hz at an interval between 20 µPa and 200 Pa [8].
2 Materials and Methods
The design of this audiometer has as its starting point an Arduino MEGA 2560
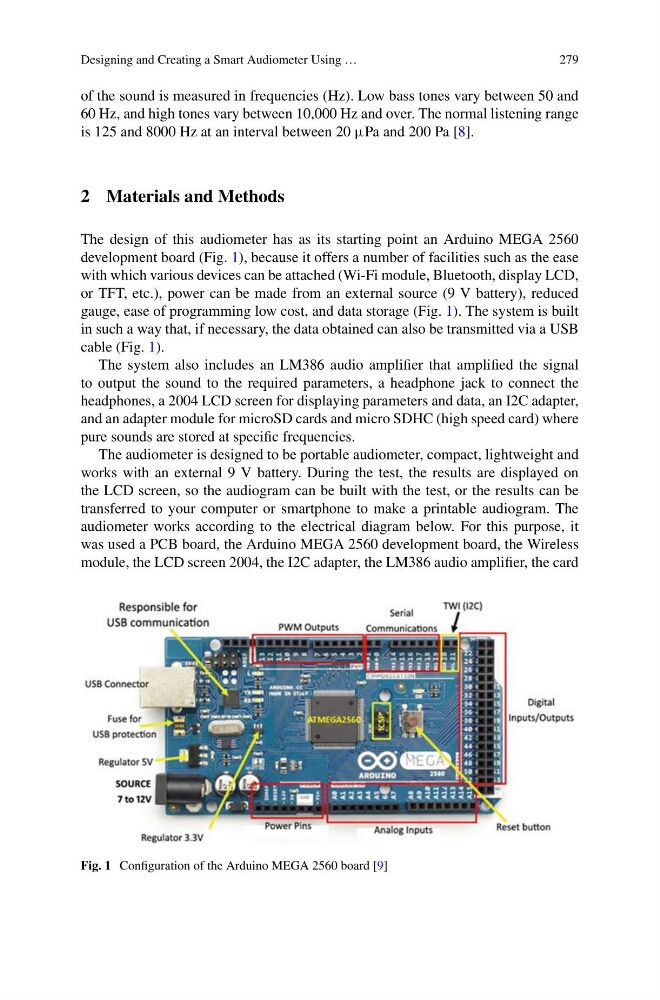
development board (Fig. 1), because it offers a number of facilities such as the ease
with which various devices can be attached (Wi-Fi module, Bluetooth, display LCD,
or TFT, etc.), power can be made from an external source (9 V battery), reduced
gauge, ease of programming low cost, and data storage (Fig. 1). The system is built
in such a way that, if necessary, the data obtained can also be transmitted via a USB
cable (Fig. 1).
The system also includes an LM386 audio amplifier that amplified the signal
to output the sound to the required parameters, a headphone jack to connect the
headphones, a 2004 LCD screen for displaying parameters and data, an I2C adapter,
and an adapter module for microSD cards and micro SDHC (high speed card) where
pure sounds are stored at specific frequencies.
The audiometer is designed to be portable audiometer, compact, lightweight and
works with an external 9 V battery. During the test, the results are displayed on
the LCD screen, so the audiogram can be built with the test, or the results can be
transferred to your computer or smartphone to make a printable audiogram. The
audiometer works according to the electrical diagram below. For this purpose, it
was used a PCB board, the Arduino MEGA 2560 development board, the Wireless
module, the LCD screen 2004, the I2C adapter, the LM386 audio amplifier, the card
Fig. 1 Configuration of the Arduino MEGA 2560 board [9]
279
of the sound is measured in frequencies (Hz). Low bass tones vary between 50 and
60 Hz, and high tones vary between 10,000 Hz and over. The normal listening range
is 125 and 8000 Hz at an interval between 20 µPa and 200 Pa [8].
2 Materials and Methods
The design of this audiometer has as its starting point an Arduino MEGA 2560
development board (Fig. 1), because it offers a number of facilities such as the ease
with which various devices can be attached (Wi-Fi module, Bluetooth, display LCD,
or TFT, etc.), power can be made from an external source (9 V battery), reduced
gauge, ease of programming low cost, and data storage (Fig. 1). The system is built
in such a way that, if necessary, the data obtained can also be transmitted via a USB
cable (Fig. 1).
The system also includes an LM386 audio amplifier that amplified the signal
to output the sound to the required parameters, a headphone jack to connect the
headphones, a 2004 LCD screen for displaying parameters and data, an I2C adapter,
and an adapter module for microSD cards and micro SDHC (high speed card) where
pure sounds are stored at specific frequencies.
The audiometer is designed to be portable audiometer, compact, lightweight and
works with an external 9 V battery. During the test, the results are displayed on
the LCD screen, so the audiogram can be built with the test, or the results can be
transferred to your computer or smartphone to make a printable audiogram. The
audiometer works according to the electrical diagram below. For this purpose, it
was used a PCB board, the Arduino MEGA 2560 development board, the Wireless
module, the LCD screen 2004, the I2C adapter, the LM386 audio amplifier, the card
Fig. 1 Configuration of the Arduino MEGA 2560 board [9]