

10.2 Measuring
149
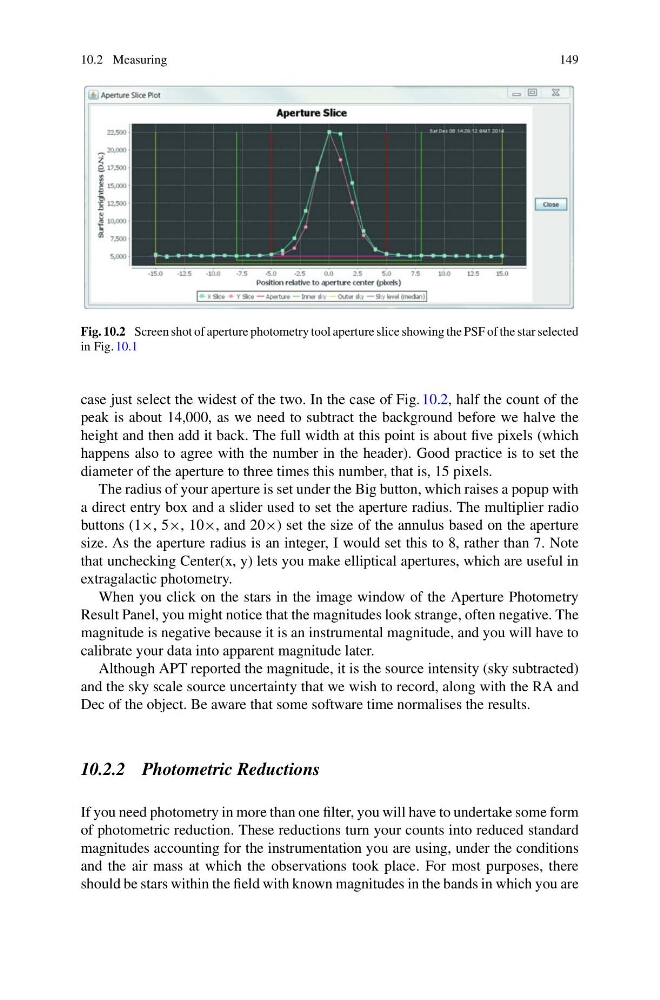
Fig. 10.2 Screen shot of aperture photometry tool aperture slice showing the PSF of the star selected
in Fig. 10.1
case just select the widest of the two. In the case of Fig. 10.2, half the count of the
peak is about 14,000, as we need to subtract the background before we halve the
height and then add it back. The full width at this point is about five pixels (which
happens also to agree with the number in the header). Good practice is to set the
diameter of the aperture to three times this number, that is, 15 pixels.
The radius of your aperture is set under the Big button, which raises a popup with
a direct entry box and a slider used to set the aperture radius. The multiplier radio
buttons (1×, 5×, 10×, and 20×) set the size of the annulus based on the aperture
size. As the aperture radius is an integer, I would set this to 8, rather than 7. Note
that unchecking Center(x, y) lets you make elliptical apertures, which are useful in
extragalactic photometry.
When you click on the stars in the image window of the Aperture Photometry
Result Panel, you might notice that the magnitudes look strange, often negative. The
magnitude is negative because it is an instrumental magnitude, and you will have to
calibrate your data into apparent magnitude later.
Although APT reported the magnitude, it is the source intensity (sky subtracted)
and the sky scale source uncertainty that we wish to record, along with the RA and
Dec of the object. Be aware that some software time normalises the results.
10.2.2 Photometric Reductions
If you need photometry in more than one filter, you will have to undertake some form
of photometric reduction. These reductions turn your counts into reduced standard
magnitudes accounting for the instrumentation you are using, under the conditions
and the air mass at which the observations took place. For most purposes, there
should be stars within the field with known magnitudes in the bands in which you are
149
Fig. 10.2 Screen shot of aperture photometry tool aperture slice showing the PSF of the star selected
in Fig. 10.1
case just select the widest of the two. In the case of Fig. 10.2, half the count of the
peak is about 14,000, as we need to subtract the background before we halve the
height and then add it back. The full width at this point is about five pixels (which
happens also to agree with the number in the header). Good practice is to set the
diameter of the aperture to three times this number, that is, 15 pixels.
The radius of your aperture is set under the Big button, which raises a popup with
a direct entry box and a slider used to set the aperture radius. The multiplier radio
buttons (1×, 5×, 10×, and 20×) set the size of the annulus based on the aperture
size. As the aperture radius is an integer, I would set this to 8, rather than 7. Note
that unchecking Center(x, y) lets you make elliptical apertures, which are useful in
extragalactic photometry.
When you click on the stars in the image window of the Aperture Photometry
Result Panel, you might notice that the magnitudes look strange, often negative. The
magnitude is negative because it is an instrumental magnitude, and you will have to
calibrate your data into apparent magnitude later.
Although APT reported the magnitude, it is the source intensity (sky subtracted)
and the sky scale source uncertainty that we wish to record, along with the RA and
Dec of the object. Be aware that some software time normalises the results.
10.2.2 Photometric Reductions
If you need photometry in more than one filter, you will have to undertake some form
of photometric reduction. These reductions turn your counts into reduced standard
magnitudes accounting for the instrumentation you are using, under the conditions
and the air mass at which the observations took place. For most purposes, there
should be stars within the field with known magnitudes in the bands in which you are