

5. To image the first pair of leaves and the vegetative meristem
from above, position the seedling such that the VM faces
upward toward the microscope objective.
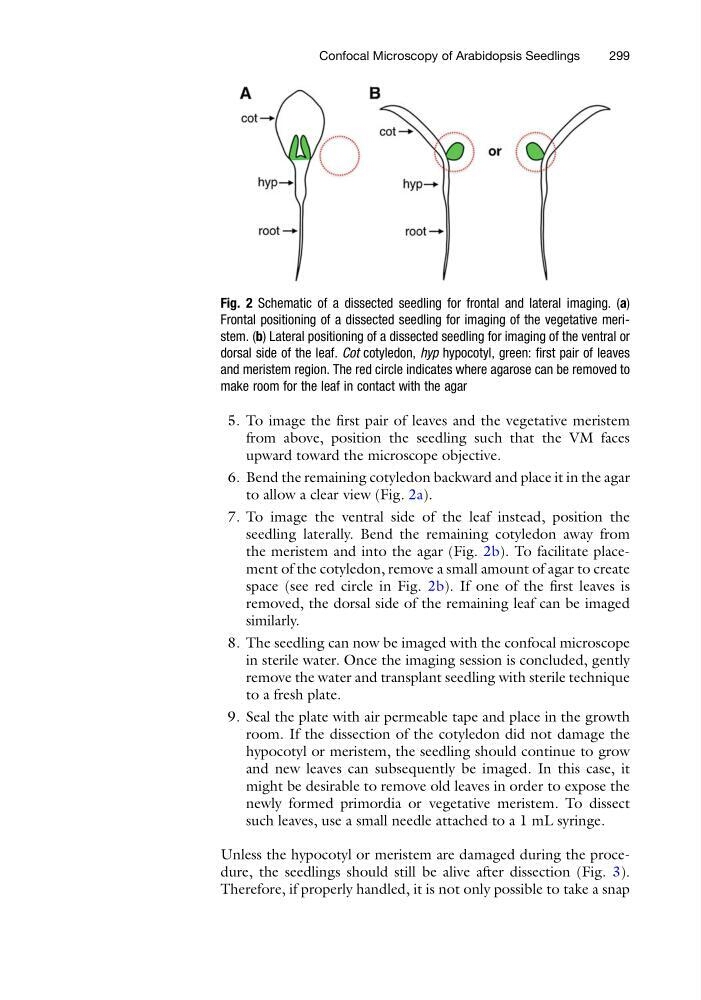
6. Bend the remaining cotyledon backward and place it in the agar
to allow a clear view (Fig. 2a).
7. To image the ventral side of the leaf instead, position the
seedling laterally. Bend the remaining cotyledon away from
the meristem and into the agar (Fig. 2b). To facilitate placement of the cotyledon, remove a small amount of agar to create
space (see red circle in Fig. 2b). If one of the first leaves is
removed, the dorsal side of the remaining leaf can be imaged
similarly.
8. The seedling can now be imaged with the confocal microscope
in sterile water. Once the imaging session is concluded, gently
remove the water and transplant seedling with sterile technique
to a fresh plate.
9. Seal the plate with air permeable tape and place in the growth
room. If the dissection of the cotyledon did not damage the
hypocotyl or meristem, the seedling should continue to grow
and new leaves can subsequently be imaged. In this case, it
might be desirable to remove old leaves in order to expose the
newly formed primordia or vegetative meristem. To dissect
such leaves, use a small needle attached to a 1 mL syringe.
Unless the hypocotyl or meristem are damaged during the procedure, the seedlings should still be alive after dissection (Fig. 3).
Therefore, if properly handled, it is not only possible to take a snap
Fig. 2 Schematic of a dissected seedling for frontal and lateral imaging. (a)
Frontal positioning of a dissected seedling for imaging of the vegetative meristem. (b) Lateral positioning of a dissected seedling for imaging of the ventral or
dorsal side of the leaf. Cot cotyledon, hyp hypocotyl, green: first pair of leaves
and meristem region. The red circle indicates where agarose can be removed to
make room for the leaf in contact with the agar
Confocal Microscopy of Arabidopsis Seedlings
299
from above, position the seedling such that the VM faces
upward toward the microscope objective.
6. Bend the remaining cotyledon backward and place it in the agar
to allow a clear view (Fig. 2a).
7. To image the ventral side of the leaf instead, position the
seedling laterally. Bend the remaining cotyledon away from
the meristem and into the agar (Fig. 2b). To facilitate placement of the cotyledon, remove a small amount of agar to create
space (see red circle in Fig. 2b). If one of the first leaves is
removed, the dorsal side of the remaining leaf can be imaged
similarly.
8. The seedling can now be imaged with the confocal microscope
in sterile water. Once the imaging session is concluded, gently
remove the water and transplant seedling with sterile technique
to a fresh plate.
9. Seal the plate with air permeable tape and place in the growth
room. If the dissection of the cotyledon did not damage the
hypocotyl or meristem, the seedling should continue to grow
and new leaves can subsequently be imaged. In this case, it
might be desirable to remove old leaves in order to expose the
newly formed primordia or vegetative meristem. To dissect
such leaves, use a small needle attached to a 1 mL syringe.
Unless the hypocotyl or meristem are damaged during the procedure, the seedlings should still be alive after dissection (Fig. 3).
Therefore, if properly handled, it is not only possible to take a snap
Fig. 2 Schematic of a dissected seedling for frontal and lateral imaging. (a)
Frontal positioning of a dissected seedling for imaging of the vegetative meristem. (b) Lateral positioning of a dissected seedling for imaging of the ventral or
dorsal side of the leaf. Cot cotyledon, hyp hypocotyl, green: first pair of leaves
and meristem region. The red circle indicates where agarose can be removed to
make room for the leaf in contact with the agar
Confocal Microscopy of Arabidopsis Seedlings
299