

94
1. Remove supernatant from each well.
2. Add a small portion of PBS to remove cellular debris, then
gently shake the plate by hand, and remove it with a pipette.
When removing medium or PBS with a pipette do not touch
the formed cellular monolayer to avoid any unwanted scratches
that will impede the assay.
3. Create the scratch.
There are two methods that can be followed:
One is by hand with a sterilized tip of a pipette which is the
cost-effective way. Apply medium pressure as overpressing
the tip might harm the slide surface. Try to create consistent scratches with gaps of the same width in all wells.
The other is by adding an insert before the cell seeding and
removing it after cells have reached confluency. Different
shapes and sizes of inserts are commercially available like
linear or circular. Inserts guarantee reproducibility of the
wound.
4. Wash again with PBS to remove the extracted cells.
5. Add growth medium with and without the tested substances.
Always use one well in each plate as control (plain growth
medium). The other wells should be treated with growth
medium containing the final product and separately all the
added moieties like drugs, targeting agents, and
nanoparticles.
6. Observe and acquire image under microscope at time point
zero (t = 0 s/min/h/days). This should be the 0% gap width
coverage or 100% gap width.
7. Continue the observations and image acquisitions at the
desired time intervals, e.g., at 24, 48, and 72 h, depending on
the tested substances.
8. You can conduct image analysis through different software
where the gap width at each time interval can be calculated as
the cells migrate or proliferate to close the gap.
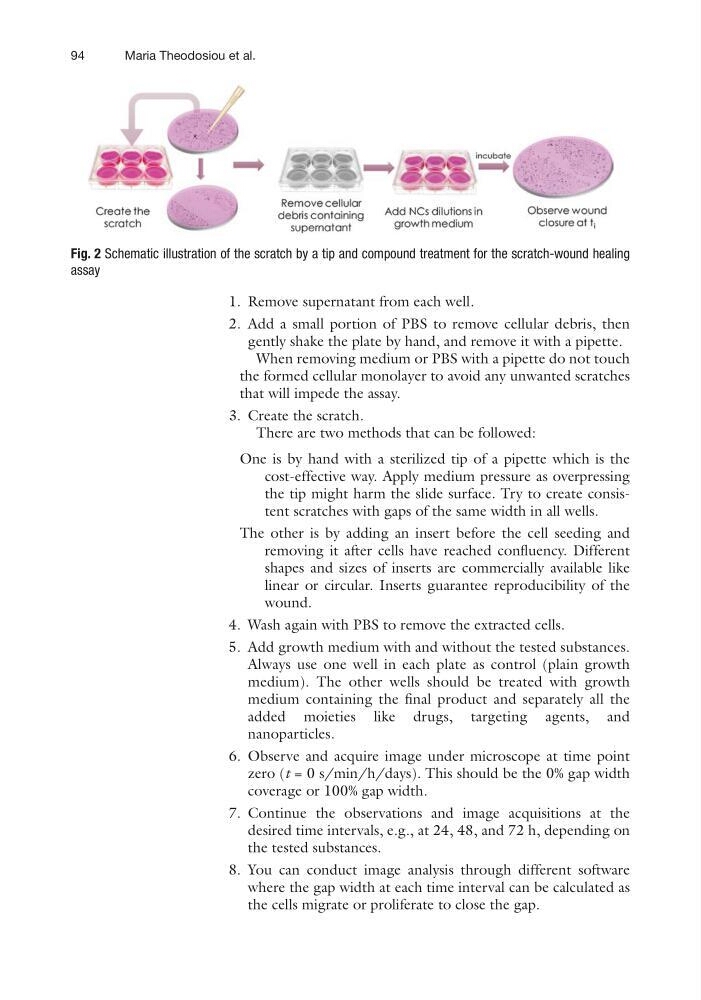
Fig. 2 Schematic illustration of the scratch by a tip and compound treatment for the scratch-wound healing
assay
Maria Theodosiou et al.
1. Remove supernatant from each well.
2. Add a small portion of PBS to remove cellular debris, then
gently shake the plate by hand, and remove it with a pipette.
When removing medium or PBS with a pipette do not touch
the formed cellular monolayer to avoid any unwanted scratches
that will impede the assay.
3. Create the scratch.
There are two methods that can be followed:
One is by hand with a sterilized tip of a pipette which is the
cost-effective way. Apply medium pressure as overpressing
the tip might harm the slide surface. Try to create consistent scratches with gaps of the same width in all wells.
The other is by adding an insert before the cell seeding and
removing it after cells have reached confluency. Different
shapes and sizes of inserts are commercially available like
linear or circular. Inserts guarantee reproducibility of the
wound.
4. Wash again with PBS to remove the extracted cells.
5. Add growth medium with and without the tested substances.
Always use one well in each plate as control (plain growth
medium). The other wells should be treated with growth
medium containing the final product and separately all the
added moieties like drugs, targeting agents, and
nanoparticles.
6. Observe and acquire image under microscope at time point
zero (t = 0 s/min/h/days). This should be the 0% gap width
coverage or 100% gap width.
7. Continue the observations and image acquisitions at the
desired time intervals, e.g., at 24, 48, and 72 h, depending on
the tested substances.
8. You can conduct image analysis through different software
where the gap width at each time interval can be calculated as
the cells migrate or proliferate to close the gap.
Fig. 2 Schematic illustration of the scratch by a tip and compound treatment for the scratch-wound healing
assay
Maria Theodosiou et al.