

12. Cut the explants in small pieces using the hair knife and fine
forceps (Movie 4). A complete unilateral neural crest region
can be cut into 4–5 pieces each containing ~100–200 cells.
13. Transfer the explants onto the Fibronectin-coated dish.
14. Array the explants to facilitate monitoring of the explants
under the microscope (see Note 10).
15. Let the explants adhere to the substrate for at least 15 min
before moving the dish.
3.2 Time-Lapse
Imaging
1. Gently place your dish onto the microscope.
2. Check explants viability and fluorescence if embryos were
microinjected with a tracer prior to dissection.
3. Adjust lighting conditions (light intensity, exposure time).
4. Record the XY positions of each explants.
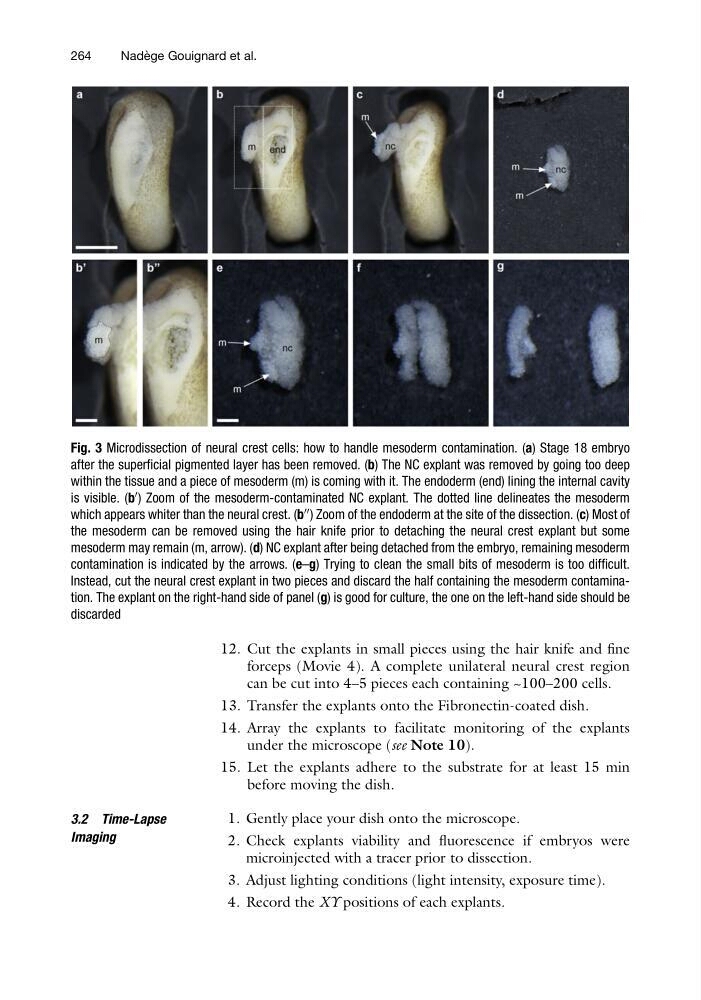
Fig. 3 Microdissection of neural crest cells: how to handle mesoderm contamination. (a) Stage 18 embryo
after the superficial pigmented layer has been removed. (b) The NC explant was removed by going too deep
within the tissue and a piece of mesoderm (m) is coming with it. The endoderm (end) lining the internal cavity
is visible. (b
0 ) Zoom of the mesoderm-contaminated NC explant. The dotted line delineates the mesoderm
which appears whiter than the neural crest. (b
00 ) Zoom of the endoderm at the site of the dissection. (c) Most of
the mesoderm can be removed using the hair knife prior to detaching the neural crest explant but some
mesoderm may remain (m, arrow). (d) NC explant after being detached from the embryo, remaining mesoderm
contamination is indicated by the arrows. (e–g) Trying to clean the small bits of mesoderm is too difficult.
Instead, cut the neural crest explant in two pieces and discard the half containing the mesoderm contamination. The explant on the right-hand side of panel (g) is good for culture, the one on the left-hand side should be
discarded
264
Nade ` ge Gouignard et al.
forceps (Movie 4). A complete unilateral neural crest region
can be cut into 4–5 pieces each containing ~100–200 cells.
13. Transfer the explants onto the Fibronectin-coated dish.
14. Array the explants to facilitate monitoring of the explants
under the microscope (see Note 10).
15. Let the explants adhere to the substrate for at least 15 min
before moving the dish.
3.2 Time-Lapse
Imaging
1. Gently place your dish onto the microscope.
2. Check explants viability and fluorescence if embryos were
microinjected with a tracer prior to dissection.
3. Adjust lighting conditions (light intensity, exposure time).
4. Record the XY positions of each explants.
Fig. 3 Microdissection of neural crest cells: how to handle mesoderm contamination. (a) Stage 18 embryo
after the superficial pigmented layer has been removed. (b) The NC explant was removed by going too deep
within the tissue and a piece of mesoderm (m) is coming with it. The endoderm (end) lining the internal cavity
is visible. (b
0 ) Zoom of the mesoderm-contaminated NC explant. The dotted line delineates the mesoderm
which appears whiter than the neural crest. (b
00 ) Zoom of the endoderm at the site of the dissection. (c) Most of
the mesoderm can be removed using the hair knife prior to detaching the neural crest explant but some
mesoderm may remain (m, arrow). (d) NC explant after being detached from the embryo, remaining mesoderm
contamination is indicated by the arrows. (e–g) Trying to clean the small bits of mesoderm is too difficult.
Instead, cut the neural crest explant in two pieces and discard the half containing the mesoderm contamination. The explant on the right-hand side of panel (g) is good for culture, the one on the left-hand side should be
discarded
264
Nade ` ge Gouignard et al.