

10. Using a P20 micropipette set to 10 μL rapidly transfer the
explant into a dish containing DFA1Â (Movie 3).
11. Repeat steps 3–10 to collect multiple explants.
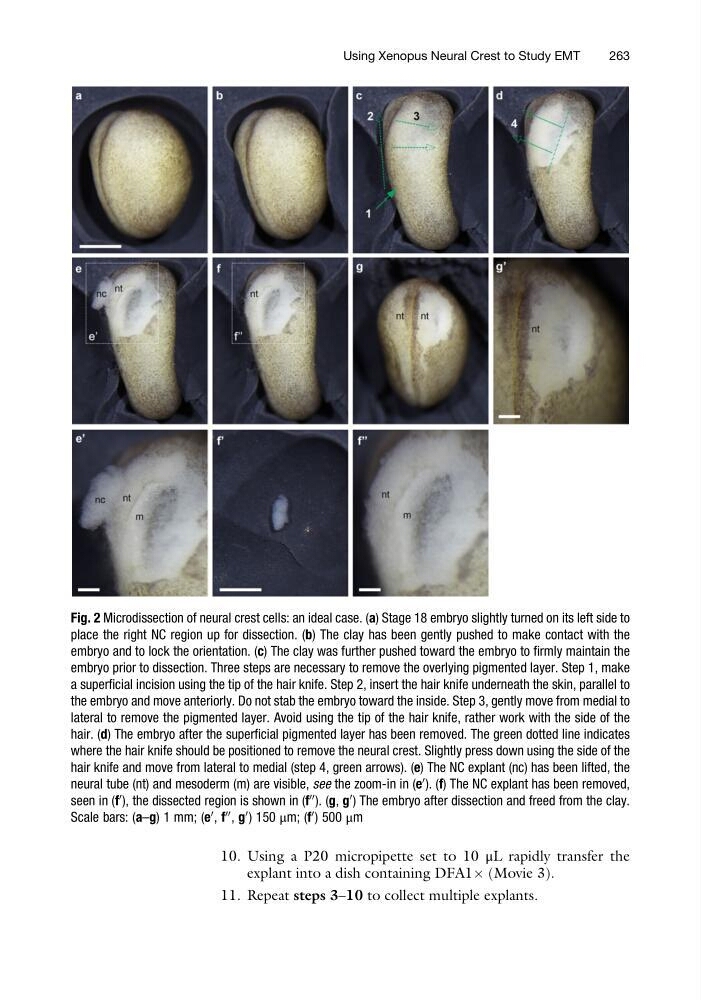
Fig. 2 Microdissection of neural crest cells: an ideal case. (a) Stage 18 embryo slightly turned on its left side to
place the right NC region up for dissection. (b) The clay has been gently pushed to make contact with the
embryo and to lock the orientation. (c) The clay was further pushed toward the embryo to firmly maintain the
embryo prior to dissection. Three steps are necessary to remove the overlying pigmented layer. Step 1, make
a superficial incision using the tip of the hair knife. Step 2, insert the hair knife underneath the skin, parallel to
the embryo and move anteriorly. Do not stab the embryo toward the inside. Step 3, gently move from medial to
lateral to remove the pigmented layer. Avoid using the tip of the hair knife, rather work with the side of the
hair. (d) The embryo after the superficial pigmented layer has been removed. The green dotted line indicates
where the hair knife should be positioned to remove the neural crest. Slightly press down using the side of the
hair knife and move from lateral to medial (step 4, green arrows). (e) The NC explant (nc) has been lifted, the
neural tube (nt) and mesoderm (m) are visible, see the zoom-in in (e
0 ). (f) The NC explant has been removed,
seen in (f
0 ), the dissected region is shown in (f
00 ). (g, g
0 ) The embryo after dissection and freed from the clay.
Scale bars: (a–g) 1 mm; (e
0 , f
00 , g
0 ) 150 μm; (f
0 ) 500 μm
Using Xenopus Neural Crest to Study EMT
263
explant into a dish containing DFA1Â (Movie 3).
11. Repeat steps 3–10 to collect multiple explants.
Fig. 2 Microdissection of neural crest cells: an ideal case. (a) Stage 18 embryo slightly turned on its left side to
place the right NC region up for dissection. (b) The clay has been gently pushed to make contact with the
embryo and to lock the orientation. (c) The clay was further pushed toward the embryo to firmly maintain the
embryo prior to dissection. Three steps are necessary to remove the overlying pigmented layer. Step 1, make
a superficial incision using the tip of the hair knife. Step 2, insert the hair knife underneath the skin, parallel to
the embryo and move anteriorly. Do not stab the embryo toward the inside. Step 3, gently move from medial to
lateral to remove the pigmented layer. Avoid using the tip of the hair knife, rather work with the side of the
hair. (d) The embryo after the superficial pigmented layer has been removed. The green dotted line indicates
where the hair knife should be positioned to remove the neural crest. Slightly press down using the side of the
hair knife and move from lateral to medial (step 4, green arrows). (e) The NC explant (nc) has been lifted, the
neural tube (nt) and mesoderm (m) are visible, see the zoom-in in (e
0 ). (f) The NC explant has been removed,
seen in (f
0 ), the dissected region is shown in (f
00 ). (g, g
0 ) The embryo after dissection and freed from the clay.
Scale bars: (a–g) 1 mm; (e
0 , f
00 , g
0 ) 150 μm; (f
0 ) 500 μm
Using Xenopus Neural Crest to Study EMT
263