

6. Apply a 22 Â 40 coverslip over the embryos; it is best to
gradually lower the coverslip to minimise bubble entrapment.
Seal the ends of the coverslip by using nail varnish and allow to
dry for few minutes before taking to the microscope; this
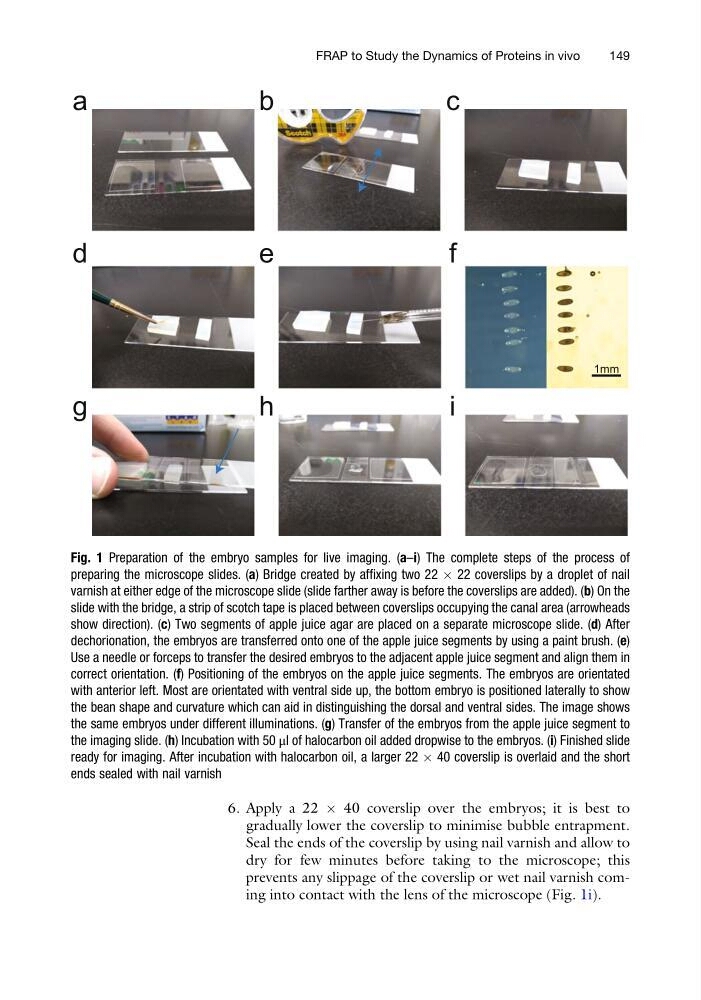
prevents any slippage of the coverslip or wet nail varnish coming into contact with the lens of the microscope (Fig. 1i).
b
c
a
d
e
f
g
h
i
1mm
Fig. 1 Preparation of the embryo samples for live imaging. (a–i) The complete steps of the process of
preparing the microscope slides. (a) Bridge created by affixing two 22 Â 22 coverslips by a droplet of nail
varnish at either edge of the microscope slide (slide farther away is before the coverslips are added). (b) On the
slide with the bridge, a strip of scotch tape is placed between coverslips occupying the canal area (arrowheads
show direction). (c) Two segments of apple juice agar are placed on a separate microscope slide. (d) After
dechorionation, the embryos are transferred onto one of the apple juice segments by using a paint brush. (e)
Use a needle or forceps to transfer the desired embryos to the adjacent apple juice segment and align them in
correct orientation. (f) Positioning of the embryos on the apple juice segments. The embryos are orientated
with anterior left. Most are orientated with ventral side up, the bottom embryo is positioned laterally to show
the bean shape and curvature which can aid in distinguishing the dorsal and ventral sides. The image shows
the same embryos under different illuminations. (g) Transfer of the embryos from the apple juice segment to
the imaging slide. (h) Incubation with 50 μl of halocarbon oil added dropwise to the embryos. (i) Finished slide
ready for imaging. After incubation with halocarbon oil, a larger 22 Â 40 coverslip is overlaid and the short
ends sealed with nail varnish
FRAP to Study the Dynamics of Proteins in vivo
149
gradually lower the coverslip to minimise bubble entrapment.
Seal the ends of the coverslip by using nail varnish and allow to
dry for few minutes before taking to the microscope; this
prevents any slippage of the coverslip or wet nail varnish coming into contact with the lens of the microscope (Fig. 1i).
b
c
a
d
e
f
g
h
i
1mm
Fig. 1 Preparation of the embryo samples for live imaging. (a–i) The complete steps of the process of
preparing the microscope slides. (a) Bridge created by affixing two 22 Â 22 coverslips by a droplet of nail
varnish at either edge of the microscope slide (slide farther away is before the coverslips are added). (b) On the
slide with the bridge, a strip of scotch tape is placed between coverslips occupying the canal area (arrowheads
show direction). (c) Two segments of apple juice agar are placed on a separate microscope slide. (d) After
dechorionation, the embryos are transferred onto one of the apple juice segments by using a paint brush. (e)
Use a needle or forceps to transfer the desired embryos to the adjacent apple juice segment and align them in
correct orientation. (f) Positioning of the embryos on the apple juice segments. The embryos are orientated
with anterior left. Most are orientated with ventral side up, the bottom embryo is positioned laterally to show
the bean shape and curvature which can aid in distinguishing the dorsal and ventral sides. The image shows
the same embryos under different illuminations. (g) Transfer of the embryos from the apple juice segment to
the imaging slide. (h) Incubation with 50 μl of halocarbon oil added dropwise to the embryos. (i) Finished slide
ready for imaging. After incubation with halocarbon oil, a larger 22 Â 40 coverslip is overlaid and the short
ends sealed with nail varnish
FRAP to Study the Dynamics of Proteins in vivo
149