

3.5 Input
of Registered Files
Next, the users can access the “Select files” in the project navigation
section. On this page, the users can select and add files to be sent to
the jPOST repository from their computer. Files can be added for
each of the following four categories: raw data, peak list, search
results, and others (Fig. 6).
3.5.1 Raw Data
1. Select the “Raw data” button from the file category tab (which
is selected by default).
2. Select an appropriate preset for the raw data file you want to
add in order to associate the metadata presets with the file (the
selected preset is displayed in the lower panel).
3. Select each of the four categories of presets.
4. Select and add files from the computer. Drag and drop the files
to an area enclosed by the dotted line, or click the area and
select them from the dialog box (the files are added to the list at
the bottom and the title of the associated presets are also
displayed).
3.5.2 Peak List
1. Select the “Peak list” button from the file category tab.
2. For the “Format,” select the file format of the
corresponding file.
3. Drag and drop or select the files in the same way as described
above.
3.5.3 Search Results
1. Select the “Search results” button from the file category tab.
2. Select the software used from the “Software” tab.
3. Select the appropriate file format from the “Format” tab.
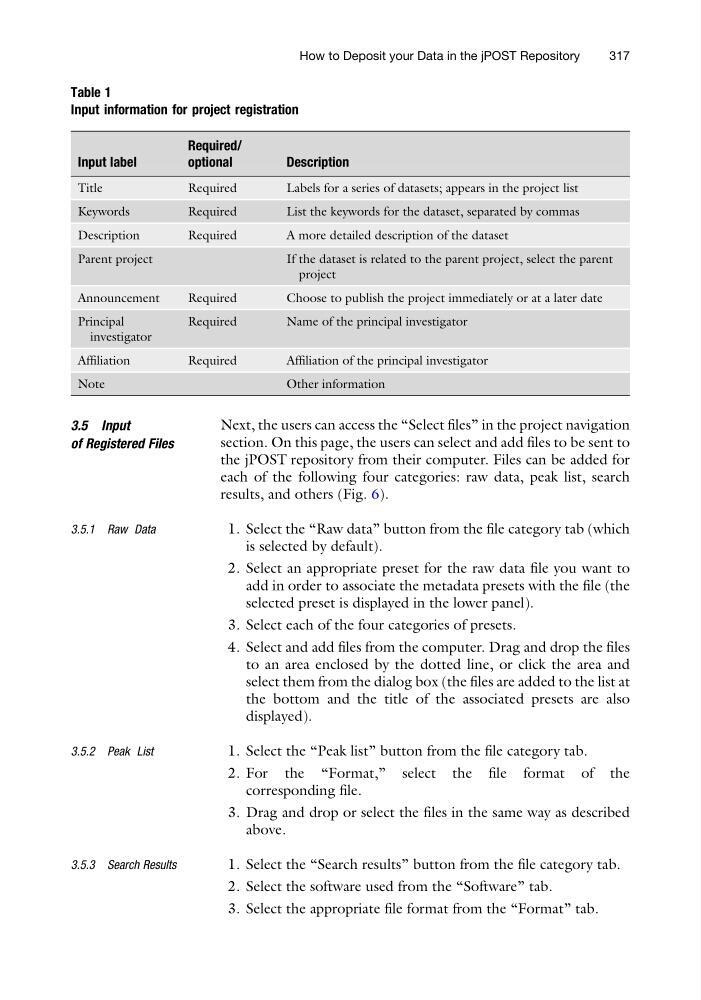
Table 1
Input information for project registration
Input label
Required/
optional
Description
Title
Required
Labels for a series of datasets; appears in the project list
Keywords
Required
List the keywords for the dataset, separated by commas
Description
Required
A more detailed description of the dataset
Parent project
If the dataset is related to the parent project, select the parent
project
Announcement
Required
Choose to publish the project immediately or at a later date
Principal
investigator
Required
Name of the principal investigator
Affiliation
Required
Affiliation of the principal investigator
Note
Other information
How to Deposit your Data in the jPOST Repository
317
of Registered Files
Next, the users can access the “Select files” in the project navigation
section. On this page, the users can select and add files to be sent to
the jPOST repository from their computer. Files can be added for
each of the following four categories: raw data, peak list, search
results, and others (Fig. 6).
3.5.1 Raw Data
1. Select the “Raw data” button from the file category tab (which
is selected by default).
2. Select an appropriate preset for the raw data file you want to
add in order to associate the metadata presets with the file (the
selected preset is displayed in the lower panel).
3. Select each of the four categories of presets.
4. Select and add files from the computer. Drag and drop the files
to an area enclosed by the dotted line, or click the area and
select them from the dialog box (the files are added to the list at
the bottom and the title of the associated presets are also
displayed).
3.5.2 Peak List
1. Select the “Peak list” button from the file category tab.
2. For the “Format,” select the file format of the
corresponding file.
3. Drag and drop or select the files in the same way as described
above.
3.5.3 Search Results
1. Select the “Search results” button from the file category tab.
2. Select the software used from the “Software” tab.
3. Select the appropriate file format from the “Format” tab.
Table 1
Input information for project registration
Input label
Required/
optional
Description
Title
Required
Labels for a series of datasets; appears in the project list
Keywords
Required
List the keywords for the dataset, separated by commas
Description
Required
A more detailed description of the dataset
Parent project
If the dataset is related to the parent project, select the parent
project
Announcement
Required
Choose to publish the project immediately or at a later date
Principal
investigator
Required
Name of the principal investigator
Affiliation
Required
Affiliation of the principal investigator
Note
Other information
How to Deposit your Data in the jPOST Repository
317