

where with the last equality we replaced θ with θ + 2π in (6.237). Rewriting the
above, we get
w 1 θ þ 2π
ð
Þ¼w 0 θ
ð Þ and w 0 θ þ 2π
ð
Þ¼w 1 θ
ð Þ:
That is, adding 2π to θ, w 0 and w 1 are switched to each other.
Let us further think of the two-valued function of w(z) ¼ z
1/2 . Strictly speaking, an
analytic function cannot be a two-valued function. This is because if so, the
continuity and differentiability will be lost from the function and, hence, the
analyticity would be broken. Then, we must make a suitable device to avoid
it. Such a device is called a Riemann surface.
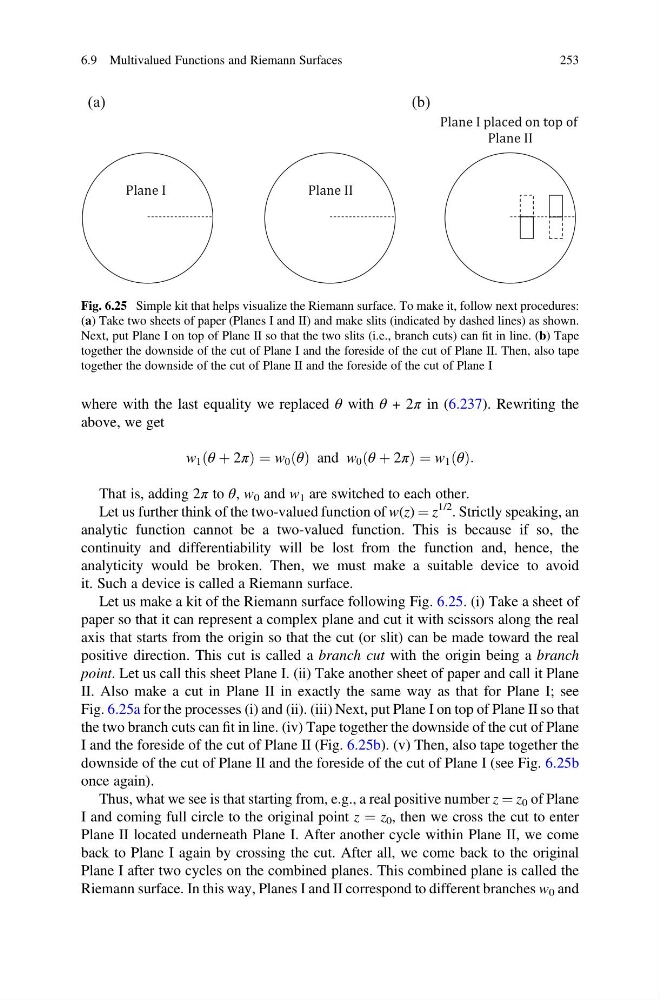
Let us make a kit of the Riemann surface following Fig. 6.25. (i) Take a sheet of
paper so that it can represent a complex plane and cut it with scissors along the real
axis that starts from the origin so that the cut (or slit) can be made toward the real
positive direction. This cut is called a branch cut with the origin being a branch
point. Let us call this sheet Plane I. (ii) Take another sheet of paper and call it Plane
II. Also make a cut in Plane II in exactly the same way as that for Plane I; see
Fig. 6.25a for the processes (i) and (ii). (iii) Next, put Plane I on top of Plane II so that
the two branch cuts can fit in line. (iv) Tape together the downside of the cut of Plane
I and the foreside of the cut of Plane II (Fig. 6.25b). (v) Then, also tape together the
downside of the cut of Plane II and the foreside of the cut of Plane I (see Fig. 6.25b
once again).
Thus, what we see is that starting from, e.g., a real positive number z ¼ z 0 of Plane
I and coming full circle to the original point z ¼ z 0 , then we cross the cut to enter
Plane II located underneath Plane I. After another cycle within Plane II, we come
back to Plane I again by crossing the cut. After all, we come back to the original
Plane I after two cycles on the combined planes. This combined plane is called the
Riemann surface. In this way, Planes I and II correspond to different branches w 0 and
Plane I
Plane II
(a)
Plane I placed on top of
Plane II
(b)
Fig. 6.25 Simple kit that helps visualize the Riemann surface. To make it, follow next procedures:
(a) Take two sheets of paper (Planes I and II) and make slits (indicated by dashed lines) as shown.
Next, put Plane I on top of Plane II so that the two slits (i.e., branch cuts) can fit in line. (b) Tape
together the downside of the cut of Plane I and the foreside of the cut of Plane II. Then, also tape
together the downside of the cut of Plane II and the foreside of the cut of Plane I
6.9 Multivalued Functions and Riemann Surfaces
253
above, we get
w 1 θ þ 2π
ð
Þ¼w 0 θ
ð Þ and w 0 θ þ 2π
ð
Þ¼w 1 θ
ð Þ:
That is, adding 2π to θ, w 0 and w 1 are switched to each other.
Let us further think of the two-valued function of w(z) ¼ z
1/2 . Strictly speaking, an
analytic function cannot be a two-valued function. This is because if so, the
continuity and differentiability will be lost from the function and, hence, the
analyticity would be broken. Then, we must make a suitable device to avoid
it. Such a device is called a Riemann surface.
Let us make a kit of the Riemann surface following Fig. 6.25. (i) Take a sheet of
paper so that it can represent a complex plane and cut it with scissors along the real
axis that starts from the origin so that the cut (or slit) can be made toward the real
positive direction. This cut is called a branch cut with the origin being a branch
point. Let us call this sheet Plane I. (ii) Take another sheet of paper and call it Plane
II. Also make a cut in Plane II in exactly the same way as that for Plane I; see
Fig. 6.25a for the processes (i) and (ii). (iii) Next, put Plane I on top of Plane II so that
the two branch cuts can fit in line. (iv) Tape together the downside of the cut of Plane
I and the foreside of the cut of Plane II (Fig. 6.25b). (v) Then, also tape together the
downside of the cut of Plane II and the foreside of the cut of Plane I (see Fig. 6.25b
once again).
Thus, what we see is that starting from, e.g., a real positive number z ¼ z 0 of Plane
I and coming full circle to the original point z ¼ z 0 , then we cross the cut to enter
Plane II located underneath Plane I. After another cycle within Plane II, we come
back to Plane I again by crossing the cut. After all, we come back to the original
Plane I after two cycles on the combined planes. This combined plane is called the
Riemann surface. In this way, Planes I and II correspond to different branches w 0 and
Plane I
Plane II
(a)
Plane I placed on top of
Plane II
(b)
Fig. 6.25 Simple kit that helps visualize the Riemann surface. To make it, follow next procedures:
(a) Take two sheets of paper (Planes I and II) and make slits (indicated by dashed lines) as shown.
Next, put Plane I on top of Plane II so that the two slits (i.e., branch cuts) can fit in line. (b) Tape
together the downside of the cut of Plane I and the foreside of the cut of Plane II. Then, also tape
together the downside of the cut of Plane II and the foreside of the cut of Plane I
6.9 Multivalued Functions and Riemann Surfaces
253