

freely available visualization package that can display segmented
tomograms as well. In this workflow, Amira is used also to manually
classify different membrane types within the resultant segmentation
(see Fig. 6d).
1. To start, convert both the membrane and microtubule segmentation output volumes (.hdf) to .mrc files using the
e2proc3d conversion command: e2proc3d.py.
2. Open the converted microtubule segmentation volume (.mrc)
in Amira, and browse to the “Segmentation Editor” tab.
Under the Selection window, activate the “Threshold” tool,
and adjust the mask until voxels representing the microtubules
are highlighted sufficiently.
3. In the “Materials” window, right-click and add a material called
“Microtubules”. Add these voxels to the new material by pressing “Select Masked Voxels”.
For membranes, complete the two previous steps in the
same manner as above. In order to classify membranes for
display/modeling purposes, the 3D membrane segmentation
can be subdivided into individual membrane types (mitochondria, plasma membrane, etc.) using the following steps: After
thresholding all membranes as above, add another material and
label it as the compartment you are about to segment (e.g.,
plasma membrane). This time, under the “Selection” tab, click
“Pick & Move”. In the right-hand window, click on all plasma
membrane segments. Again “Select Masked Voxels”. From the
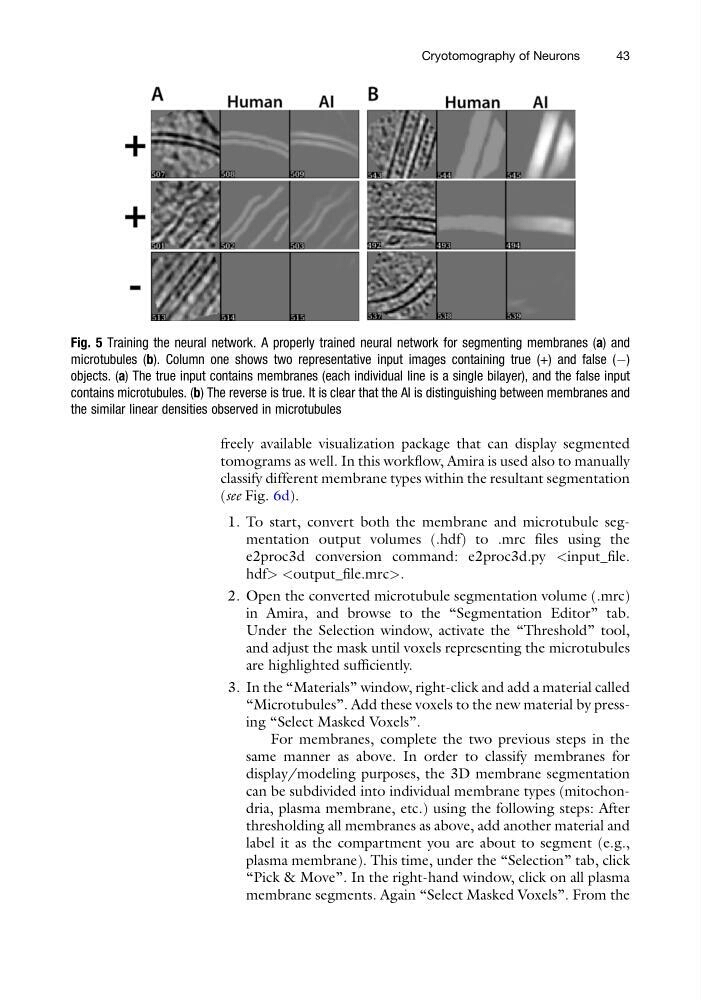
Fig. 5 Training the neural network. A properly trained neural network for segmenting membranes (a) and
microtubules (b). Column one shows two representative input images containing true (+) and false (À)
objects. (a) The true input contains membranes (each individual line is a single bilayer), and the false input
contains microtubules. (b) The reverse is true. It is clear that the AI is distinguishing between membranes and
the similar linear densities observed in microtubules
Cryotomography of Neurons
43
tomograms as well. In this workflow, Amira is used also to manually
classify different membrane types within the resultant segmentation
(see Fig. 6d).
1. To start, convert both the membrane and microtubule segmentation output volumes (.hdf) to .mrc files using the
e2proc3d conversion command: e2proc3d.py
2. Open the converted microtubule segmentation volume (.mrc)
in Amira, and browse to the “Segmentation Editor” tab.
Under the Selection window, activate the “Threshold” tool,
and adjust the mask until voxels representing the microtubules
are highlighted sufficiently.
3. In the “Materials” window, right-click and add a material called
“Microtubules”. Add these voxels to the new material by pressing “Select Masked Voxels”.
For membranes, complete the two previous steps in the
same manner as above. In order to classify membranes for
display/modeling purposes, the 3D membrane segmentation
can be subdivided into individual membrane types (mitochondria, plasma membrane, etc.) using the following steps: After
thresholding all membranes as above, add another material and
label it as the compartment you are about to segment (e.g.,
plasma membrane). This time, under the “Selection” tab, click
“Pick & Move”. In the right-hand window, click on all plasma
membrane segments. Again “Select Masked Voxels”. From the
Fig. 5 Training the neural network. A properly trained neural network for segmenting membranes (a) and
microtubules (b). Column one shows two representative input images containing true (+) and false (À)
objects. (a) The true input contains membranes (each individual line is a single bilayer), and the false input
contains microtubules. (b) The reverse is true. It is clear that the AI is distinguishing between membranes and
the similar linear densities observed in microtubules
Cryotomography of Neurons
43