

3.1.1 Preparation of the
Thin Carbon Films in
Spark-Free Conditions
The goal of this procedure is to prepare a high-quality carbon film
as flat and intact support for 2D crystals.
1. File one graphite rod to a pencil point and file the other
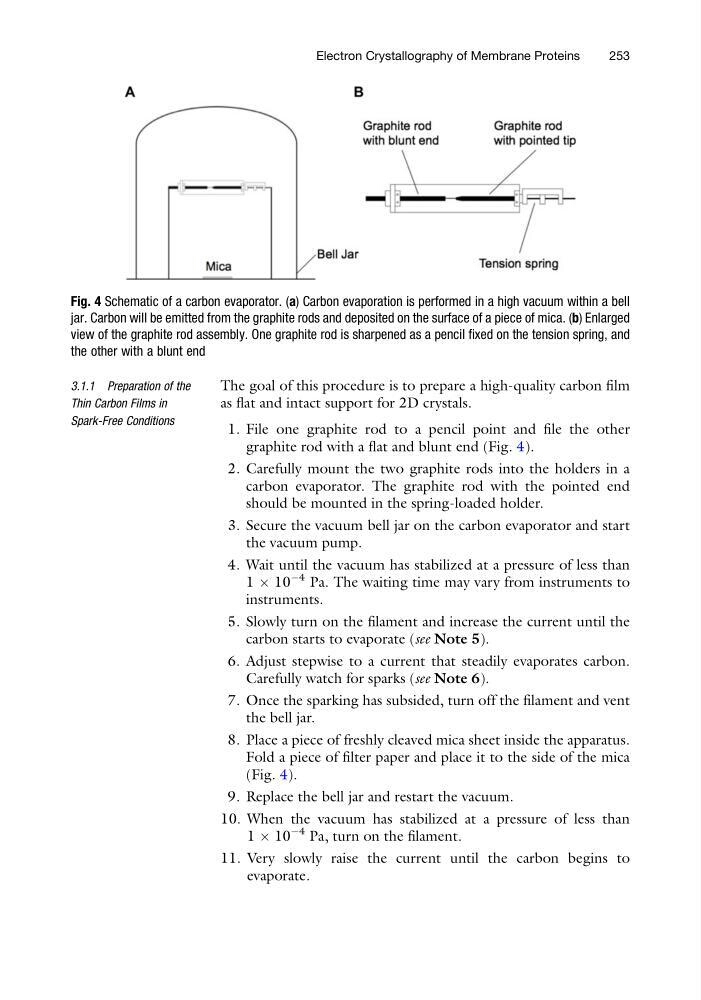
graphite rod with a flat and blunt end (Fig. 4).
2. Carefully mount the two graphite rods into the holders in a
carbon evaporator. The graphite rod with the pointed end
should be mounted in the spring-loaded holder.
3. Secure the vacuum bell jar on the carbon evaporator and start
the vacuum pump.
4. Wait until the vacuum has stabilized at a pressure of less than
1 Â 10
À4 Pa. The waiting time may vary from instruments to
instruments.
5. Slowly turn on the filament and increase the current until the
carbon starts to evaporate (see Note 5).
6. Adjust stepwise to a current that steadily evaporates carbon.
Carefully watch for sparks (see Note 6).
7. Once the sparking has subsided, turn off the filament and vent
the bell jar.
8. Place a piece of freshly cleaved mica sheet inside the apparatus.
Fold a piece of filter paper and place it to the side of the mica
(Fig. 4).
9. Replace the bell jar and restart the vacuum.
10. When the vacuum has stabilized at a pressure of less than
1 Â 10
À4 Pa, turn on the filament.
11. Very slowly raise the current until the carbon begins to
evaporate.
Fig. 4 Schematic of a carbon evaporator. (a) Carbon evaporation is performed in a high vacuum within a bell
jar. Carbon will be emitted from the graphite rods and deposited on the surface of a piece of mica. (b) Enlarged
view of the graphite rod assembly. One graphite rod is sharpened as a pencil fixed on the tension spring, and
the other with a blunt end
Electron Crystallography of Membrane Proteins
253
Thin Carbon Films in
Spark-Free Conditions
The goal of this procedure is to prepare a high-quality carbon film
as flat and intact support for 2D crystals.
1. File one graphite rod to a pencil point and file the other
graphite rod with a flat and blunt end (Fig. 4).
2. Carefully mount the two graphite rods into the holders in a
carbon evaporator. The graphite rod with the pointed end
should be mounted in the spring-loaded holder.
3. Secure the vacuum bell jar on the carbon evaporator and start
the vacuum pump.
4. Wait until the vacuum has stabilized at a pressure of less than
1 Â 10
À4 Pa. The waiting time may vary from instruments to
instruments.
5. Slowly turn on the filament and increase the current until the
carbon starts to evaporate (see Note 5).
6. Adjust stepwise to a current that steadily evaporates carbon.
Carefully watch for sparks (see Note 6).
7. Once the sparking has subsided, turn off the filament and vent
the bell jar.
8. Place a piece of freshly cleaved mica sheet inside the apparatus.
Fold a piece of filter paper and place it to the side of the mica
(Fig. 4).
9. Replace the bell jar and restart the vacuum.
10. When the vacuum has stabilized at a pressure of less than
1 Â 10
À4 Pa, turn on the filament.
11. Very slowly raise the current until the carbon begins to
evaporate.
Fig. 4 Schematic of a carbon evaporator. (a) Carbon evaporation is performed in a high vacuum within a bell
jar. Carbon will be emitted from the graphite rods and deposited on the surface of a piece of mica. (b) Enlarged
view of the graphite rod assembly. One graphite rod is sharpened as a pencil fixed on the tension spring, and
the other with a blunt end
Electron Crystallography of Membrane Proteins
253