

421
3D Modeling and Visualization
changed between then and now, an updated version of this lab (using the newest versions) is available online at http://www.whfreeman.com/shellito1e.
Lab Data
There is no data to be copied for this lab. You will, however, use the “Bird’s
eye” imagery from Bing Maps (see Hands-on Application 9.4: Oblique Imagery
on Bing Maps on page 280), so start that up in a Web browser.
Localizing This Lab
In this lab you will design a 3D model of a building on Youngstown State University’s (YSU’s) campus, and then view it in Google Earth. In Section 14.2,
you will take a “snapshot” of the building to start with. Rather than examining a campus building at YSU, you can start at this point with a base image of
any local building—such as the school building you’re in, a nearby landmark
or government building, or your house. You can use the same steps in this lab
and the GSU tools to design any building or structure you so choose in place
of the one used in this lab—the same lab techniques of using Google SketchUp
will still apply, you’ll just have to adapt them to your own 3D design needs.
14.1 Starting Google SketchUp
1. Start Google SketchUp (GSU). GSU will open in its initial mode. Select
the option for Choose Templates, and then from the available options
select Google Earth Modeling—Feet and Inches.
2. There are several different templates available, depending on what type
of 3D design you want to do.
3. Next, select the Start using SketchUp button.
4. GSU will open with a blank working environment, with three intersecting
lines at the center. These represent the axes you will use for 3D design—
red and green are the horizontal (x and y) axes, while blue is the vertical
(z) axis.
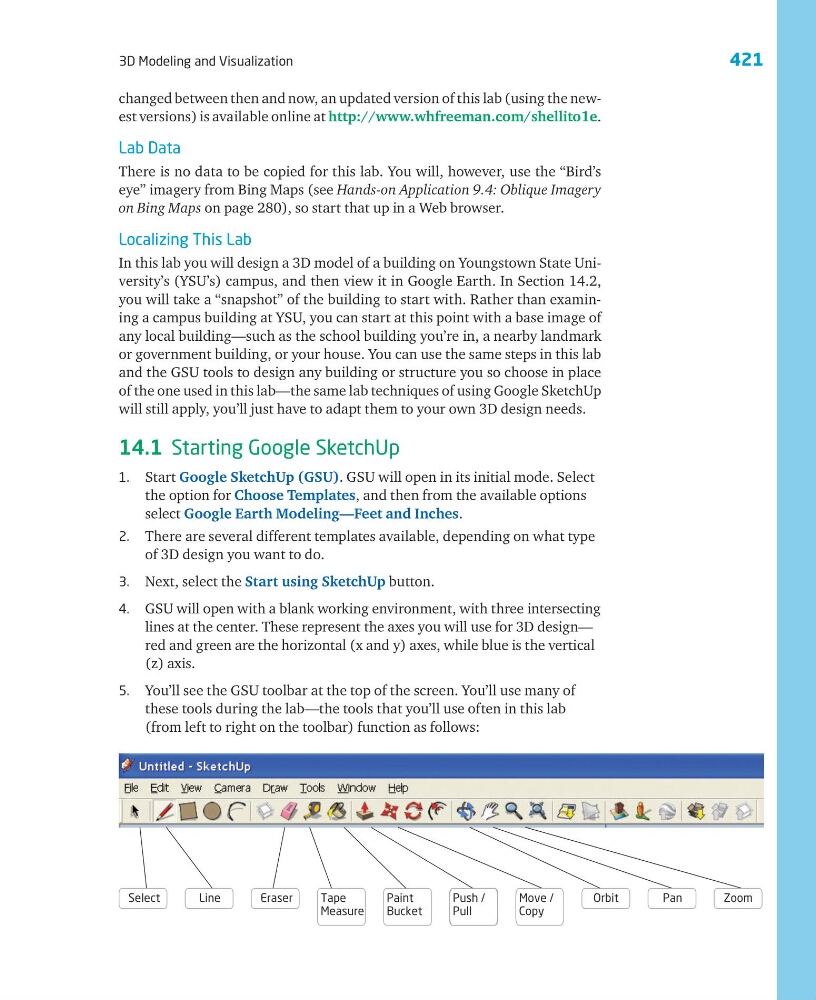
5. You’ll see the GSU toolbar at the top of the screen. You’ll use many of
these tools during the lab—the tools that you’ll use often in this lab
(from left to right on the toolbar) function as follows:
Select
Orbit
Pan
Zoom
Line
Eraser
Tape
Measure
Paint
Bucket
Push /
Pull
Move /
Copy
3D Modeling and Visualization
changed between then and now, an updated version of this lab (using the newest versions) is available online at http://www.whfreeman.com/shellito1e.
Lab Data
There is no data to be copied for this lab. You will, however, use the “Bird’s
eye” imagery from Bing Maps (see Hands-on Application 9.4: Oblique Imagery
on Bing Maps on page 280), so start that up in a Web browser.
Localizing This Lab
In this lab you will design a 3D model of a building on Youngstown State University’s (YSU’s) campus, and then view it in Google Earth. In Section 14.2,
you will take a “snapshot” of the building to start with. Rather than examining a campus building at YSU, you can start at this point with a base image of
any local building—such as the school building you’re in, a nearby landmark
or government building, or your house. You can use the same steps in this lab
and the GSU tools to design any building or structure you so choose in place
of the one used in this lab—the same lab techniques of using Google SketchUp
will still apply, you’ll just have to adapt them to your own 3D design needs.
14.1 Starting Google SketchUp
1. Start Google SketchUp (GSU). GSU will open in its initial mode. Select
the option for Choose Templates, and then from the available options
select Google Earth Modeling—Feet and Inches.
2. There are several different templates available, depending on what type
of 3D design you want to do.
3. Next, select the Start using SketchUp button.
4. GSU will open with a blank working environment, with three intersecting
lines at the center. These represent the axes you will use for 3D design—
red and green are the horizontal (x and y) axes, while blue is the vertical
(z) axis.
5. You’ll see the GSU toolbar at the top of the screen. You’ll use many of
these tools during the lab—the tools that you’ll use often in this lab
(from left to right on the toolbar) function as follows:
Select
Orbit
Pan
Zoom
Line
Eraser
Tape
Measure
Paint
Bucket
Push /
Pull
Move /
Copy