

3. Transfer the chip (using forceps) into a dish containing sterile
water for 5 min, and then place the chip in an empty dish.
4. Let the chip dry for 5 min (If necessary, remove remaining
water from the sides using a low-lint wipe).
5. Prepare fibronectin: Dilute the stock solution (1 mg/mL)
40 times in sterile D-PBS (25 μg/mL final) (e.g., for two
chips, add 25 μL of stock fibronectin to 975 μL of DPBS).
6. Add 400–500 μL of the diluted fibronectin solution on top of
the chip, making sure its covers the whole surface, and wait for
1 h to ensure the fibronectin coats the surface of the pillars.
7. In the meantime, prepare Pluronic at 0.2% w/v in D-PBS (e.g.,
40 mg in 20 mL)—and incubate at 4
C for 15 min.
8. After step 6 is complete, remove all of the fibronectin solution
from the chip by placing a wipe on the side of the chip and
letting it dry for 10 min.
9. Carefully place the coated side (top) of the chip onto a 35-mm
polystyrene dish (do not use a regular cell-culture treated
35-mm dish); press chip gently with forceps (once the chip is
in contact with the well, its position should not be changed).
Pattern Cell Colonies
Selection
Harvest
PDMS
Polystyrene
Protein Matrix
V
a
c
b
NFP-E
Localized
Electroporation
Targeted Transfection
and Expression
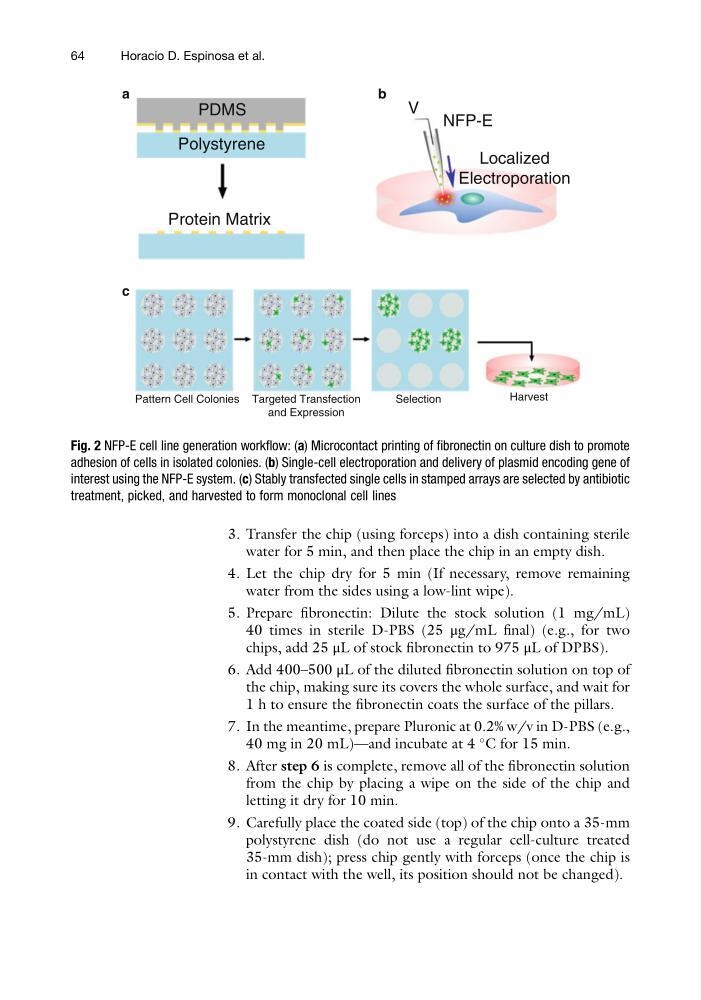
Fig. 2 NFP-E cell line generation workflow: (a) Microcontact printing of fibronectin on culture dish to promote
adhesion of cells in isolated colonies. (b) Single-cell electroporation and delivery of plasmid encoding gene of
interest using the NFP-E system. (c) Stably transfected single cells in stamped arrays are selected by antibiotic
treatment, picked, and harvested to form monoclonal cell lines
64
Horacio D. Espinosa et al.
water for 5 min, and then place the chip in an empty dish.
4. Let the chip dry for 5 min (If necessary, remove remaining
water from the sides using a low-lint wipe).
5. Prepare fibronectin: Dilute the stock solution (1 mg/mL)
40 times in sterile D-PBS (25 μg/mL final) (e.g., for two
chips, add 25 μL of stock fibronectin to 975 μL of DPBS).
6. Add 400–500 μL of the diluted fibronectin solution on top of
the chip, making sure its covers the whole surface, and wait for
1 h to ensure the fibronectin coats the surface of the pillars.
7. In the meantime, prepare Pluronic at 0.2% w/v in D-PBS (e.g.,
40 mg in 20 mL)—and incubate at 4
C for 15 min.
8. After step 6 is complete, remove all of the fibronectin solution
from the chip by placing a wipe on the side of the chip and
letting it dry for 10 min.
9. Carefully place the coated side (top) of the chip onto a 35-mm
polystyrene dish (do not use a regular cell-culture treated
35-mm dish); press chip gently with forceps (once the chip is
in contact with the well, its position should not be changed).
Pattern Cell Colonies
Selection
Harvest
PDMS
Polystyrene
Protein Matrix
V
a
c
b
NFP-E
Localized
Electroporation
Targeted Transfection
and Expression
Fig. 2 NFP-E cell line generation workflow: (a) Microcontact printing of fibronectin on culture dish to promote
adhesion of cells in isolated colonies. (b) Single-cell electroporation and delivery of plasmid encoding gene of
interest using the NFP-E system. (c) Stably transfected single cells in stamped arrays are selected by antibiotic
treatment, picked, and harvested to form monoclonal cell lines
64
Horacio D. Espinosa et al.