

Appendix A2: 235 U-Fueled and Pb–Bi–Zoned
ADS Core
A2.1 Pb–Bi Target
A2.1.1 Core Configurations
See (Figs. A2.1, A2.2, A2.3 and A2.4).
26 25 24 23
22 21 20 19 18 17
16 15 14
13 12 11 10
9
8
7
6
5
4
Z
Y
F
Fuel (1/8"P60EUEU)
X
W
Polyethylene reflector
V
U
Control rod
T
R
Safety rod
Q
F
F
F
F
F
P
F
F
F
F
F
Neutron source (Am-Be)
O
F
F
F
F
F
M
F
F
F
F
F
Fission chamber
L
F
F
F
F
F
K
Uncompensated ionization chamber
J
I
H
G
E
D
B
A
Target
A'
BF3 #2 detector (1" diameter)
BF3 #1 detector (1/2" diameter)
Optional fiber detector (LiF+ZnS)
Proton beams
C
S
N
UIC
FC
FC#1
UIC#6
UIC#5
FC#3
N
C2
S6
UIC#4
S5
C1
C3
S4
In wire position
Void region
FC#2
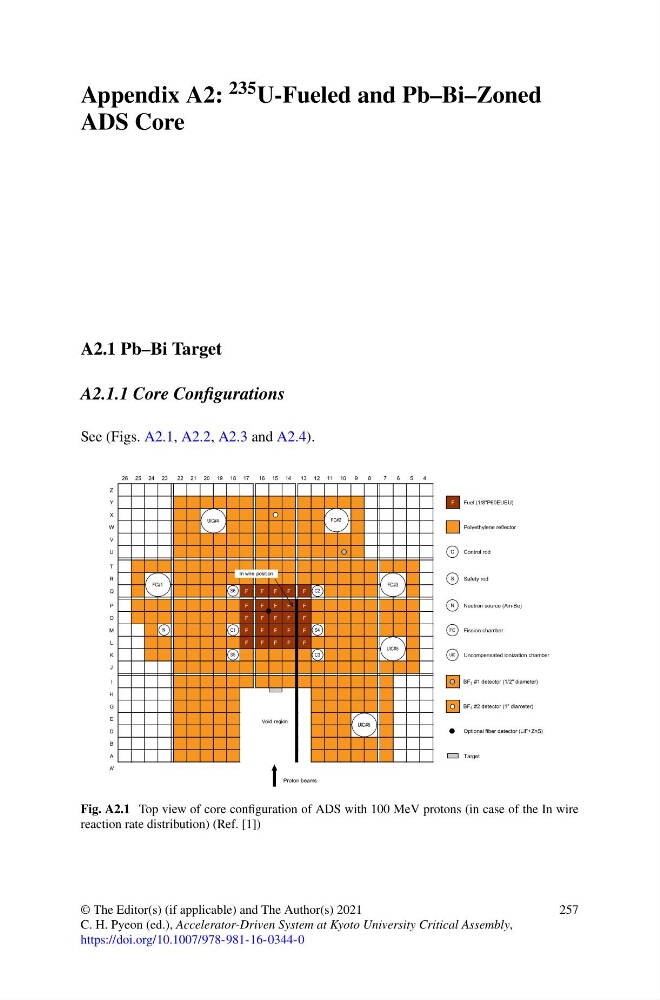
Fig. A2.1 Top view of core configuration of ADS with 100 MeV protons (in case of the In wire
reaction rate distribution) (Ref. [1])
© The Editor(s) (if applicable) and The Author(s) 2021
C. H. Pyeon (ed.), Accelerator-Driven System at Kyoto University Critical Assembly,
https://doi.org/10.1007/978-981-16-0344-0
257
ADS Core
A2.1 Pb–Bi Target
A2.1.1 Core Configurations
See (Figs. A2.1, A2.2, A2.3 and A2.4).
26 25 24 23
22 21 20 19 18 17
16 15 14
13 12 11 10
9
8
7
6
5
4
Z
Y
F
Fuel (1/8"P60EUEU)
X
W
Polyethylene reflector
V
U
Control rod
T
R
Safety rod
Q
F
F
F
F
F
P
F
F
F
F
F
Neutron source (Am-Be)
O
F
F
F
F
F
M
F
F
F
F
F
Fission chamber
L
F
F
F
F
F
K
Uncompensated ionization chamber
J
I
H
G
E
D
B
A
Target
A'
BF3 #2 detector (1" diameter)
BF3 #1 detector (1/2" diameter)
Optional fiber detector (LiF+ZnS)
Proton beams
C
S
N
UIC
FC
FC#1
UIC#6
UIC#5
FC#3
N
C2
S6
UIC#4
S5
C1
C3
S4
In wire position
Void region
FC#2
Fig. A2.1 Top view of core configuration of ADS with 100 MeV protons (in case of the In wire
reaction rate distribution) (Ref. [1])
© The Editor(s) (if applicable) and The Author(s) 2021
C. H. Pyeon (ed.), Accelerator-Driven System at Kyoto University Critical Assembly,
https://doi.org/10.1007/978-981-16-0344-0
257