

transferred to a 50 μL drop of 0.5 M sucrose solution and
connected with a 50 μL drop of wash solution for 3 min. Then
connect to another 50 μL drop of wash solution for additional
2 min. Thereafter transfer the blastocysts through the 2 Â 50 μL
of wash solution, and return into the transfer dish containing the
culture medium (SAGE Blastocyst Medium, Trumbull, CT, USA)
until transfer. Each single step is described in detail below. The
timeline for warming blastocysts requires a total of 10–11 min:
1. Take reagents from the refrigerator and allow them to warm to
room temperature. All cryoprotectants are removed at 25
C.
2. Place a 200 μL drop of TS on a dish lid surface, and place on a
warming plate (see Note 9).
3. Label a Petri dish (Nunc) with the patient’s name under the lid
as follows: TS, DS, and WS. Prepare 1 Â 50 μL of TS,
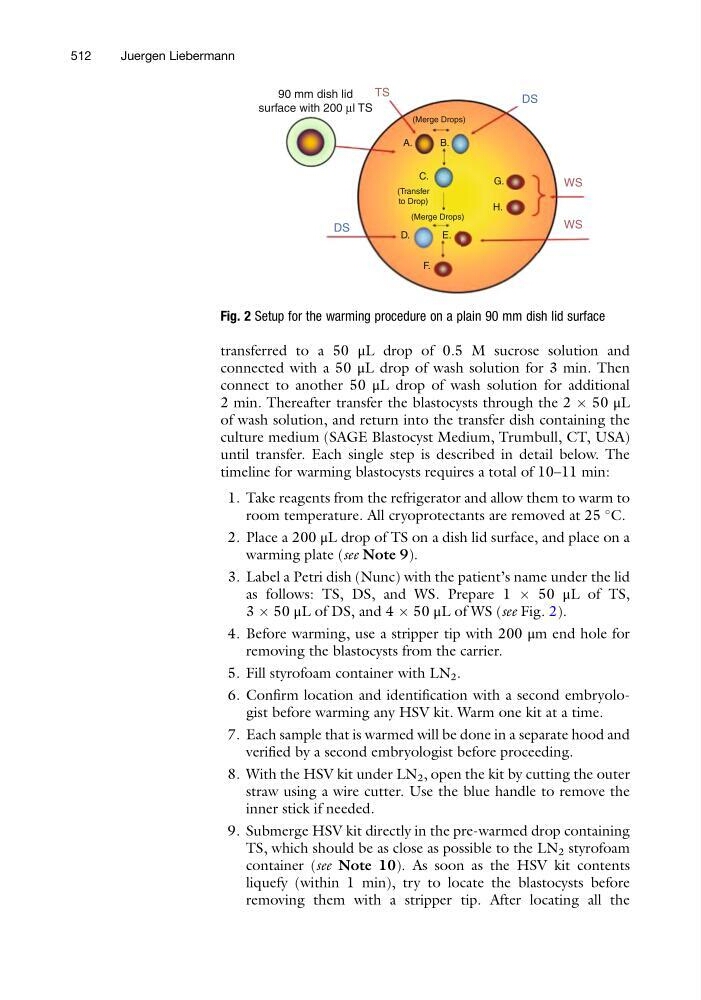
3 Â 50 μL of DS, and 4 Â 50 μL of WS (see Fig. 2).
4. Before warming, use a stripper tip with 200 μm end hole for
removing the blastocysts from the carrier.
5. Fill styrofoam container with LN 2 .
6. Confirm location and identification with a second embryologist before warming any HSV kit. Warm one kit at a time.
7. Each sample that is warmed will be done in a separate hood and
verified by a second embryologist before proceeding.
8. With the HSV kit under LN 2 , open the kit by cutting the outer
straw using a wire cutter. Use the blue handle to remove the
inner stick if needed.
9. Submerge HSV kit directly in the pre-warmed drop containing
TS, which should be as close as possible to the LN 2 styrofoam
container (see Note 10). As soon as the HSV kit contents
liquefy (within 1 min), try to locate the blastocysts before
removing them with a stripper tip. After locating all the
90 mm dish lid
surface with 200 µl TS
A.
B.
G.
H.
E.
F.
D.
C.
(Transfer
to Drop)
(Merge Drops)
(Merge Drops)
TS
WS
WS
DS
DS
Fig. 2 Setup for the warming procedure on a plain 90 mm dish lid surface
512
Juergen Liebermann
connected with a 50 μL drop of wash solution for 3 min. Then
connect to another 50 μL drop of wash solution for additional
2 min. Thereafter transfer the blastocysts through the 2 Â 50 μL
of wash solution, and return into the transfer dish containing the
culture medium (SAGE Blastocyst Medium, Trumbull, CT, USA)
until transfer. Each single step is described in detail below. The
timeline for warming blastocysts requires a total of 10–11 min:
1. Take reagents from the refrigerator and allow them to warm to
room temperature. All cryoprotectants are removed at 25
C.
2. Place a 200 μL drop of TS on a dish lid surface, and place on a
warming plate (see Note 9).
3. Label a Petri dish (Nunc) with the patient’s name under the lid
as follows: TS, DS, and WS. Prepare 1 Â 50 μL of TS,
3 Â 50 μL of DS, and 4 Â 50 μL of WS (see Fig. 2).
4. Before warming, use a stripper tip with 200 μm end hole for
removing the blastocysts from the carrier.
5. Fill styrofoam container with LN 2 .
6. Confirm location and identification with a second embryologist before warming any HSV kit. Warm one kit at a time.
7. Each sample that is warmed will be done in a separate hood and
verified by a second embryologist before proceeding.
8. With the HSV kit under LN 2 , open the kit by cutting the outer
straw using a wire cutter. Use the blue handle to remove the
inner stick if needed.
9. Submerge HSV kit directly in the pre-warmed drop containing
TS, which should be as close as possible to the LN 2 styrofoam
container (see Note 10). As soon as the HSV kit contents
liquefy (within 1 min), try to locate the blastocysts before
removing them with a stripper tip. After locating all the
90 mm dish lid
surface with 200 µl TS
A.
B.
G.
H.
E.
F.
D.
C.
(Transfer
to Drop)
(Merge Drops)
(Merge Drops)
TS
WS
WS
DS
DS
Fig. 2 Setup for the warming procedure on a plain 90 mm dish lid surface
512
Juergen Liebermann