

EG, and 0.5 M sucrose, for 45–60 s and transferred onto the HSV
using a micropipette. Immediately after the loading of not more
than two blastocysts in a 1 μL drop on the HSV, the straws can be
heat sealed, then plunged in LN 2 , and secondarily stored inside
5 mL liquid nitrogen-prefilled canes (Visotube Rond, IMV,
France). Each single step is described in detail below. The timeline
for vitrifying blastocysts requires a total of 9 min:
1. Aseptic techniques are required at all stages. For equilibration
and vitrification procedures, ensure the benchwarmer is at
room temperature (~25
C) (see Notes 3 and 4).
2. Take reagents from the refrigerator and allow them to warm to
room temperature.
3. Separate the blastocysts to freeze into a separate well. Bring this
dish to the inverted microscope, and with the embryo positioned with the laser objective, use a single pulse to hit the
blastocysts between two trophectoderm cells to collapse the
embryo. Place the dish back into the incubator for 5–10 min.
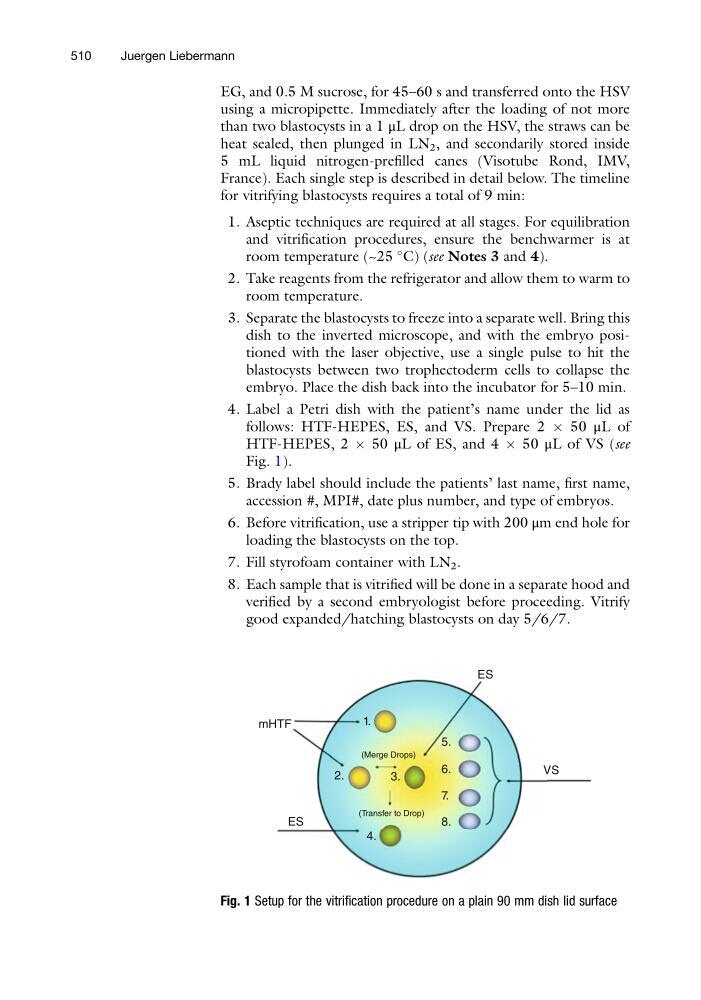
4. Label a Petri dish with the patient’s name under the lid as
follows: HTF-HEPES, ES, and VS. Prepare 2 Â 50 μL of
HTF-HEPES, 2 Â 50 μL of ES, and 4 Â 50 μL of VS (see
Fig. 1).
5. Brady label should include the patients’ last name, first name,
accession #, MPI#, date plus number, and type of embryos.
6. Before vitrification, use a stripper tip with 200 μm end hole for
loading the blastocysts on the top.
7. Fill styrofoam container with LN 2 .
8. Each sample that is vitrified will be done in a separate hood and
verified by a second embryologist before proceeding. Vitrify
good expanded/hatching blastocysts on day 5/6/7.
mHTF
VS
ES
ES
1.
2.
3.
5.
6.
7.
8.
4.
(Transfer to Drop)
(Merge Drops)
Fig. 1 Setup for the vitrification procedure on a plain 90 mm dish lid surface
510
Juergen Liebermann
using a micropipette. Immediately after the loading of not more
than two blastocysts in a 1 μL drop on the HSV, the straws can be
heat sealed, then plunged in LN 2 , and secondarily stored inside
5 mL liquid nitrogen-prefilled canes (Visotube Rond, IMV,
France). Each single step is described in detail below. The timeline
for vitrifying blastocysts requires a total of 9 min:
1. Aseptic techniques are required at all stages. For equilibration
and vitrification procedures, ensure the benchwarmer is at
room temperature (~25
C) (see Notes 3 and 4).
2. Take reagents from the refrigerator and allow them to warm to
room temperature.
3. Separate the blastocysts to freeze into a separate well. Bring this
dish to the inverted microscope, and with the embryo positioned with the laser objective, use a single pulse to hit the
blastocysts between two trophectoderm cells to collapse the
embryo. Place the dish back into the incubator for 5–10 min.
4. Label a Petri dish with the patient’s name under the lid as
follows: HTF-HEPES, ES, and VS. Prepare 2 Â 50 μL of
HTF-HEPES, 2 Â 50 μL of ES, and 4 Â 50 μL of VS (see
Fig. 1).
5. Brady label should include the patients’ last name, first name,
accession #, MPI#, date plus number, and type of embryos.
6. Before vitrification, use a stripper tip with 200 μm end hole for
loading the blastocysts on the top.
7. Fill styrofoam container with LN 2 .
8. Each sample that is vitrified will be done in a separate hood and
verified by a second embryologist before proceeding. Vitrify
good expanded/hatching blastocysts on day 5/6/7.
mHTF
VS
ES
ES
1.
2.
3.
5.
6.
7.
8.
4.
(Transfer to Drop)
(Merge Drops)
Fig. 1 Setup for the vitrification procedure on a plain 90 mm dish lid surface
510
Juergen Liebermann