

4. Iris straight scissors.
5. Double-edged stainless steel razor blades.
6. Two high-precision tweezers No. 3.
7. 0.1-mm Stainless steel insect pins.
8. Microsurgical knife 15
, 3.0-mm depth.
3 Methods
3.1 Pin-Fasten
Epicotyl Grafting
1. Arabidopsis seeds are grown on soil (see Note 1) under LD
(16/8 h) or SD (8/16 h) conditions with 22
C/20
C day/
night cycles and light intensity 100 μmol m
À2 s
À1 until the fifth
and sixth of leaves become visible and the apex contains an
apical meristem and the seventh and eighth leaf primordia.
Under our conditions, the plants take 10–12 days
(LD-grown) or 30 days (SD-grown) to develop to the optimal
stage for grafting (see Note 2).
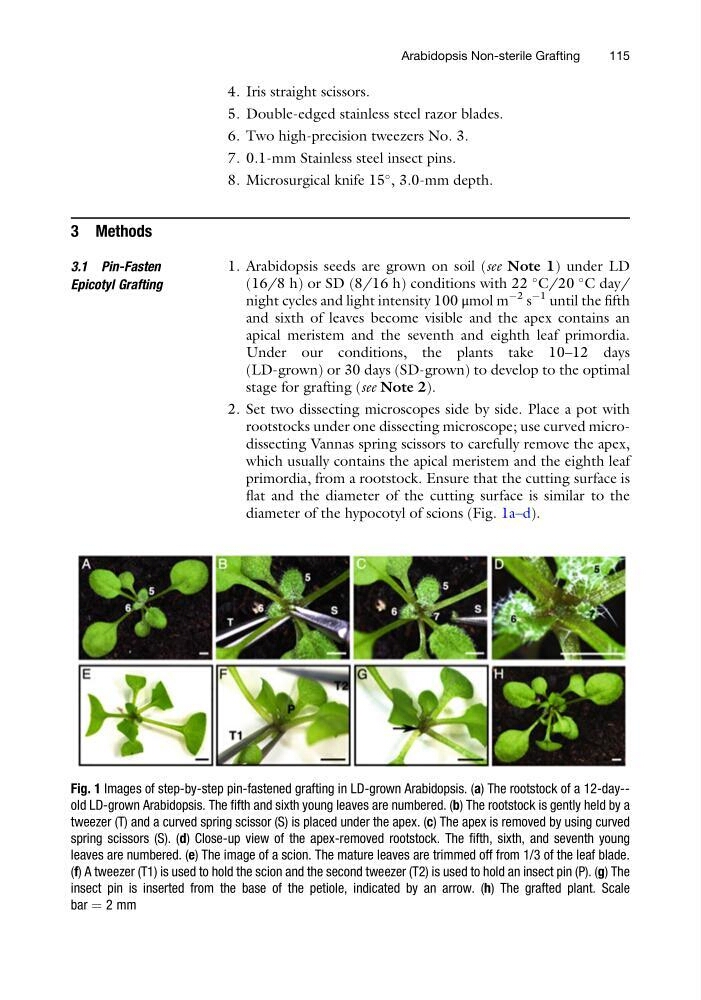
2. Set two dissecting microscopes side by side. Place a pot with
rootstocks under one dissecting microscope; use curved microdissecting Vannas spring scissors to carefully remove the apex,
which usually contains the apical meristem and the eighth leaf
primordia, from a rootstock. Ensure that the cutting surface is
flat and the diameter of the cutting surface is similar to the
diameter of the hypocotyl of scions (Fig. 1a–d).
Fig. 1 Images of step-by-step pin-fastened grafting in LD-grown Arabidopsis. (a) The rootstock of a 12-day-old LD-grown Arabidopsis. The fifth and sixth young leaves are numbered. (b) The rootstock is gently held by a
tweezer (T) and a curved spring scissor (S) is placed under the apex. (c) The apex is removed by using curved
spring scissors (S). (d) Close-up view of the apex-removed rootstock. The fifth, sixth, and seventh young
leaves are numbered. (e) The image of a scion. The mature leaves are trimmed off from 1/3 of the leaf blade.
(f) A tweezer (T1) is used to hold the scion and the second tweezer (T2) is used to hold an insect pin (P). (g) The
insect pin is inserted from the base of the petiole, indicated by an arrow. (h) The grafted plant. Scale
bar ¼ 2 mm
Arabidopsis Non-sterile Grafting
115
5. Double-edged stainless steel razor blades.
6. Two high-precision tweezers No. 3.
7. 0.1-mm Stainless steel insect pins.
8. Microsurgical knife 15
, 3.0-mm depth.
3 Methods
3.1 Pin-Fasten
Epicotyl Grafting
1. Arabidopsis seeds are grown on soil (see Note 1) under LD
(16/8 h) or SD (8/16 h) conditions with 22
C/20
C day/
night cycles and light intensity 100 μmol m
À2 s
À1 until the fifth
and sixth of leaves become visible and the apex contains an
apical meristem and the seventh and eighth leaf primordia.
Under our conditions, the plants take 10–12 days
(LD-grown) or 30 days (SD-grown) to develop to the optimal
stage for grafting (see Note 2).
2. Set two dissecting microscopes side by side. Place a pot with
rootstocks under one dissecting microscope; use curved microdissecting Vannas spring scissors to carefully remove the apex,
which usually contains the apical meristem and the eighth leaf
primordia, from a rootstock. Ensure that the cutting surface is
flat and the diameter of the cutting surface is similar to the
diameter of the hypocotyl of scions (Fig. 1a–d).
Fig. 1 Images of step-by-step pin-fastened grafting in LD-grown Arabidopsis. (a) The rootstock of a 12-day-old LD-grown Arabidopsis. The fifth and sixth young leaves are numbered. (b) The rootstock is gently held by a
tweezer (T) and a curved spring scissor (S) is placed under the apex. (c) The apex is removed by using curved
spring scissors (S). (d) Close-up view of the apex-removed rootstock. The fifth, sixth, and seventh young
leaves are numbered. (e) The image of a scion. The mature leaves are trimmed off from 1/3 of the leaf blade.
(f) A tweezer (T1) is used to hold the scion and the second tweezer (T2) is used to hold an insect pin (P). (g) The
insect pin is inserted from the base of the petiole, indicated by an arrow. (h) The grafted plant. Scale
bar ¼ 2 mm
Arabidopsis Non-sterile Grafting
115