

3 Methods
3.1 Isolate
the Ectoderm Tissue
(Animal Cap) at Stage
10 Xenopus laevis
Embryo
Dissection of ectoderm is a relatively simple and standard
technique [42].
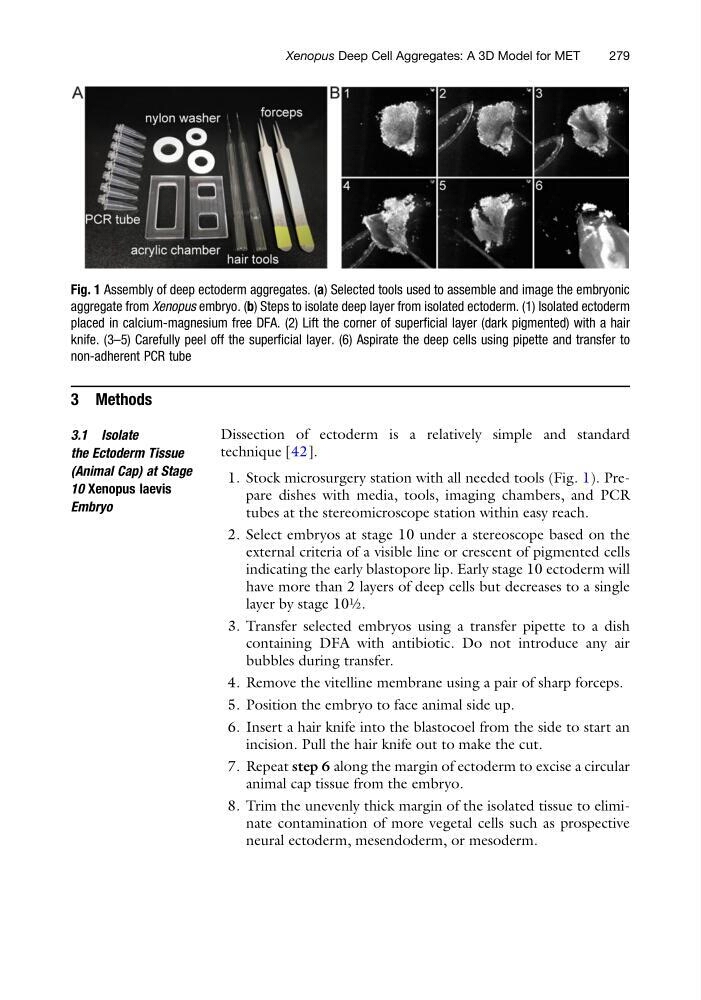
1. Stock microsurgery station with all needed tools (Fig. 1). Prepare dishes with media, tools, imaging chambers, and PCR
tubes at the stereomicroscope station within easy reach.
2. Select embryos at stage 10 under a stereoscope based on the
external criteria of a visible line or crescent of pigmented cells
indicating the early blastopore lip. Early stage 10 ectoderm will
have more than 2 layers of deep cells but decreases to a single
layer by stage 10½.
3. Transfer selected embryos using a transfer pipette to a dish
containing DFA with antibiotic. Do not introduce any air
bubbles during transfer.
4. Remove the vitelline membrane using a pair of sharp forceps.
5. Position the embryo to face animal side up.
6. Insert a hair knife into the blastocoel from the side to start an
incision. Pull the hair knife out to make the cut.
7. Repeat step 6 along the margin of ectoderm to excise a circular
animal cap tissue from the embryo.
8. Trim the unevenly thick margin of the isolated tissue to eliminate contamination of more vegetal cells such as prospective
neural ectoderm, mesendoderm, or mesoderm.
Fig. 1 Assembly of deep ectoderm aggregates. (a) Selected tools used to assemble and image the embryonic
aggregate from Xenopus embryo. (b) Steps to isolate deep layer from isolated ectoderm. (1) Isolated ectoderm
placed in calcium-magnesium free DFA. (2) Lift the corner of superficial layer (dark pigmented) with a hair
knife. (3–5) Carefully peel off the superficial layer. (6) Aspirate the deep cells using pipette and transfer to
non-adherent PCR tube
Xenopus Deep Cell Aggregates: A 3D Model for MET
279
3.1 Isolate
the Ectoderm Tissue
(Animal Cap) at Stage
10 Xenopus laevis
Embryo
Dissection of ectoderm is a relatively simple and standard
technique [42].
1. Stock microsurgery station with all needed tools (Fig. 1). Prepare dishes with media, tools, imaging chambers, and PCR
tubes at the stereomicroscope station within easy reach.
2. Select embryos at stage 10 under a stereoscope based on the
external criteria of a visible line or crescent of pigmented cells
indicating the early blastopore lip. Early stage 10 ectoderm will
have more than 2 layers of deep cells but decreases to a single
layer by stage 10½.
3. Transfer selected embryos using a transfer pipette to a dish
containing DFA with antibiotic. Do not introduce any air
bubbles during transfer.
4. Remove the vitelline membrane using a pair of sharp forceps.
5. Position the embryo to face animal side up.
6. Insert a hair knife into the blastocoel from the side to start an
incision. Pull the hair knife out to make the cut.
7. Repeat step 6 along the margin of ectoderm to excise a circular
animal cap tissue from the embryo.
8. Trim the unevenly thick margin of the isolated tissue to eliminate contamination of more vegetal cells such as prospective
neural ectoderm, mesendoderm, or mesoderm.
Fig. 1 Assembly of deep ectoderm aggregates. (a) Selected tools used to assemble and image the embryonic
aggregate from Xenopus embryo. (b) Steps to isolate deep layer from isolated ectoderm. (1) Isolated ectoderm
placed in calcium-magnesium free DFA. (2) Lift the corner of superficial layer (dark pigmented) with a hair
knife. (3–5) Carefully peel off the superficial layer. (6) Aspirate the deep cells using pipette and transfer to
non-adherent PCR tube
Xenopus Deep Cell Aggregates: A 3D Model for MET
279