

(a)
(b)
(e)
(h)
(c)
(f)
(d)
(g)
(i)
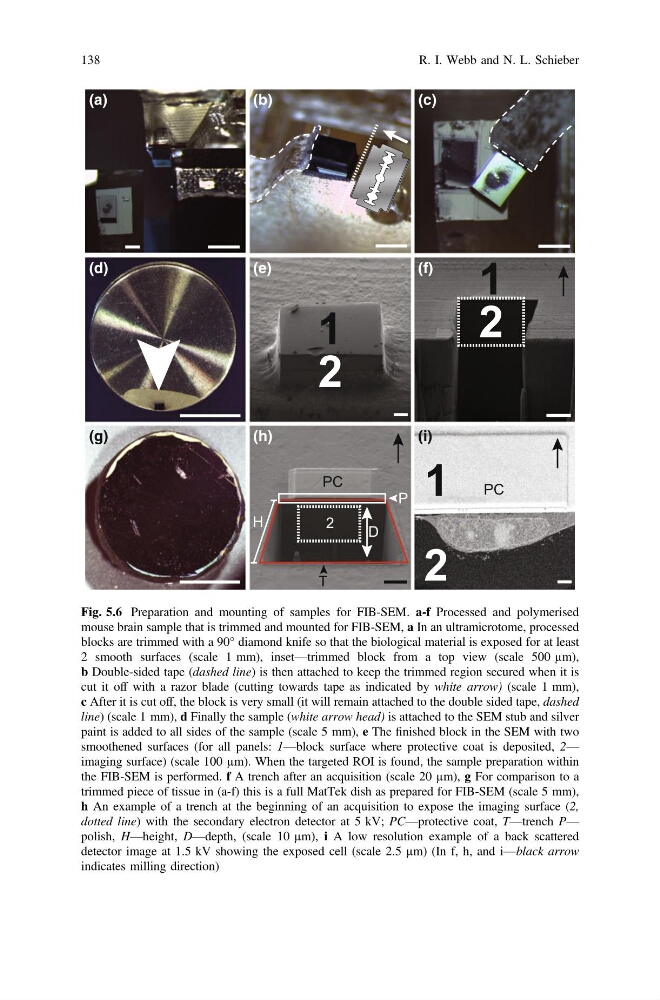
Fig. 5.6 Preparation and mounting of samples for FIB-SEM. a-f Processed and polymerised
mouse brain sample that is trimmed and mounted for FIB-SEM, a In an ultramicrotome, processed
blocks are trimmed with a 90° diamond knife so that the biological material is exposed for at least
2 smooth surfaces (scale 1 mm), inset—trimmed block from a top view (scale 500 µm),
b Double-sided tape (dashed line) is then attached to keep the trimmed region secured when it is
cut it off with a razor blade (cutting towards tape as indicated by white arrow) (scale 1 mm),
c After it is cut off, the block is very small (it will remain attached to the double sided tape, dashed
line) (scale 1 mm), d Finally the sample (white arrow head) is attached to the SEM stub and silver
paint is added to all sides of the sample (scale 5 mm), e The finished block in the SEM with two
smoothened surfaces (for all panels: 1—block surface where protective coat is deposited, 2—
imaging surface) (scale 100 µm). When the targeted ROI is found, the sample preparation within
the FIB-SEM is performed. f A trench after an acquisition (scale 20 µm), g For comparison to a
trimmed piece of tissue in (a-f) this is a full MatTek dish as prepared for FIB-SEM (scale 5 mm),
h An example of a trench at the beginning of an acquisition to expose the imaging surface (2,
dotted line) with the secondary electron detector at 5 kV; PC—protective coat, T—trench P—
polish, H—height, D—depth, (scale 10 µm), i A low resolution example of a back scattered
detector image at 1.5 kV showing the exposed cell (scale 2.5 µm) (In f, h, and i—black arrow
indicates milling direction)
138
R. I. Webb and N. L. Schieber
(b)
(e)
(h)
(c)
(f)
(d)
(g)
(i)
Fig. 5.6 Preparation and mounting of samples for FIB-SEM. a-f Processed and polymerised
mouse brain sample that is trimmed and mounted for FIB-SEM, a In an ultramicrotome, processed
blocks are trimmed with a 90° diamond knife so that the biological material is exposed for at least
2 smooth surfaces (scale 1 mm), inset—trimmed block from a top view (scale 500 µm),
b Double-sided tape (dashed line) is then attached to keep the trimmed region secured when it is
cut it off with a razor blade (cutting towards tape as indicated by white arrow) (scale 1 mm),
c After it is cut off, the block is very small (it will remain attached to the double sided tape, dashed
line) (scale 1 mm), d Finally the sample (white arrow head) is attached to the SEM stub and silver
paint is added to all sides of the sample (scale 5 mm), e The finished block in the SEM with two
smoothened surfaces (for all panels: 1—block surface where protective coat is deposited, 2—
imaging surface) (scale 100 µm). When the targeted ROI is found, the sample preparation within
the FIB-SEM is performed. f A trench after an acquisition (scale 20 µm), g For comparison to a
trimmed piece of tissue in (a-f) this is a full MatTek dish as prepared for FIB-SEM (scale 5 mm),
h An example of a trench at the beginning of an acquisition to expose the imaging surface (2,
dotted line) with the secondary electron detector at 5 kV; PC—protective coat, T—trench P—
polish, H—height, D—depth, (scale 10 µm), i A low resolution example of a back scattered
detector image at 1.5 kV showing the exposed cell (scale 2.5 µm) (In f, h, and i—black arrow
indicates milling direction)
138
R. I. Webb and N. L. Schieber